Product description
Z-Wave.Me Programmer is a full-featured programming tool for development, testing, production and production testing of IoT devices based on Z-Wave, Zigbee, Thread and BLE protocols.
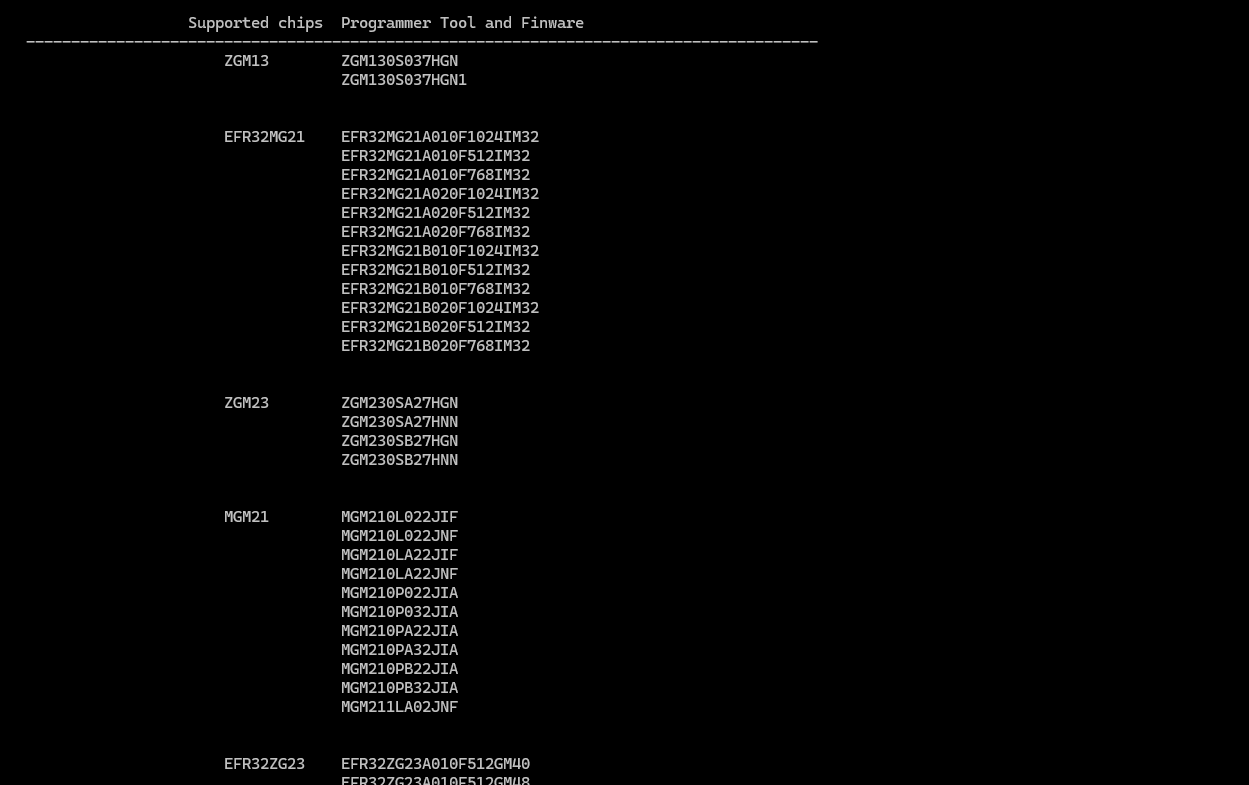
The Z-Wave.Me programmer can flash the following families of chips from Silicon Labs. For more detailed and accurate information, use Chip support:
- ZGM130S
- ZGM230S
- EFR32ZG23
- MGM21
- EFR32MG21
- EFR32MG24
The programmer can be used to manipulate the chip (lock, unlock, reboot), flash a file or flash from the internal programmer storage (called slot).
Package
The Z-Wave.Me Programmer package includes:
- Z-Wave.Me Programmer
- 2.4 GHz RP-SMA male antenna
- 868 MHz RP-SMA male antenna (for EU)
- 916 MHz RP-SMA male antenna (for US)
- CR2032 coin-cell battery
- Programming cable with IDC-10 female connector
- USB-A to USB-C cable and USB-C to USB-C cable
Connecting
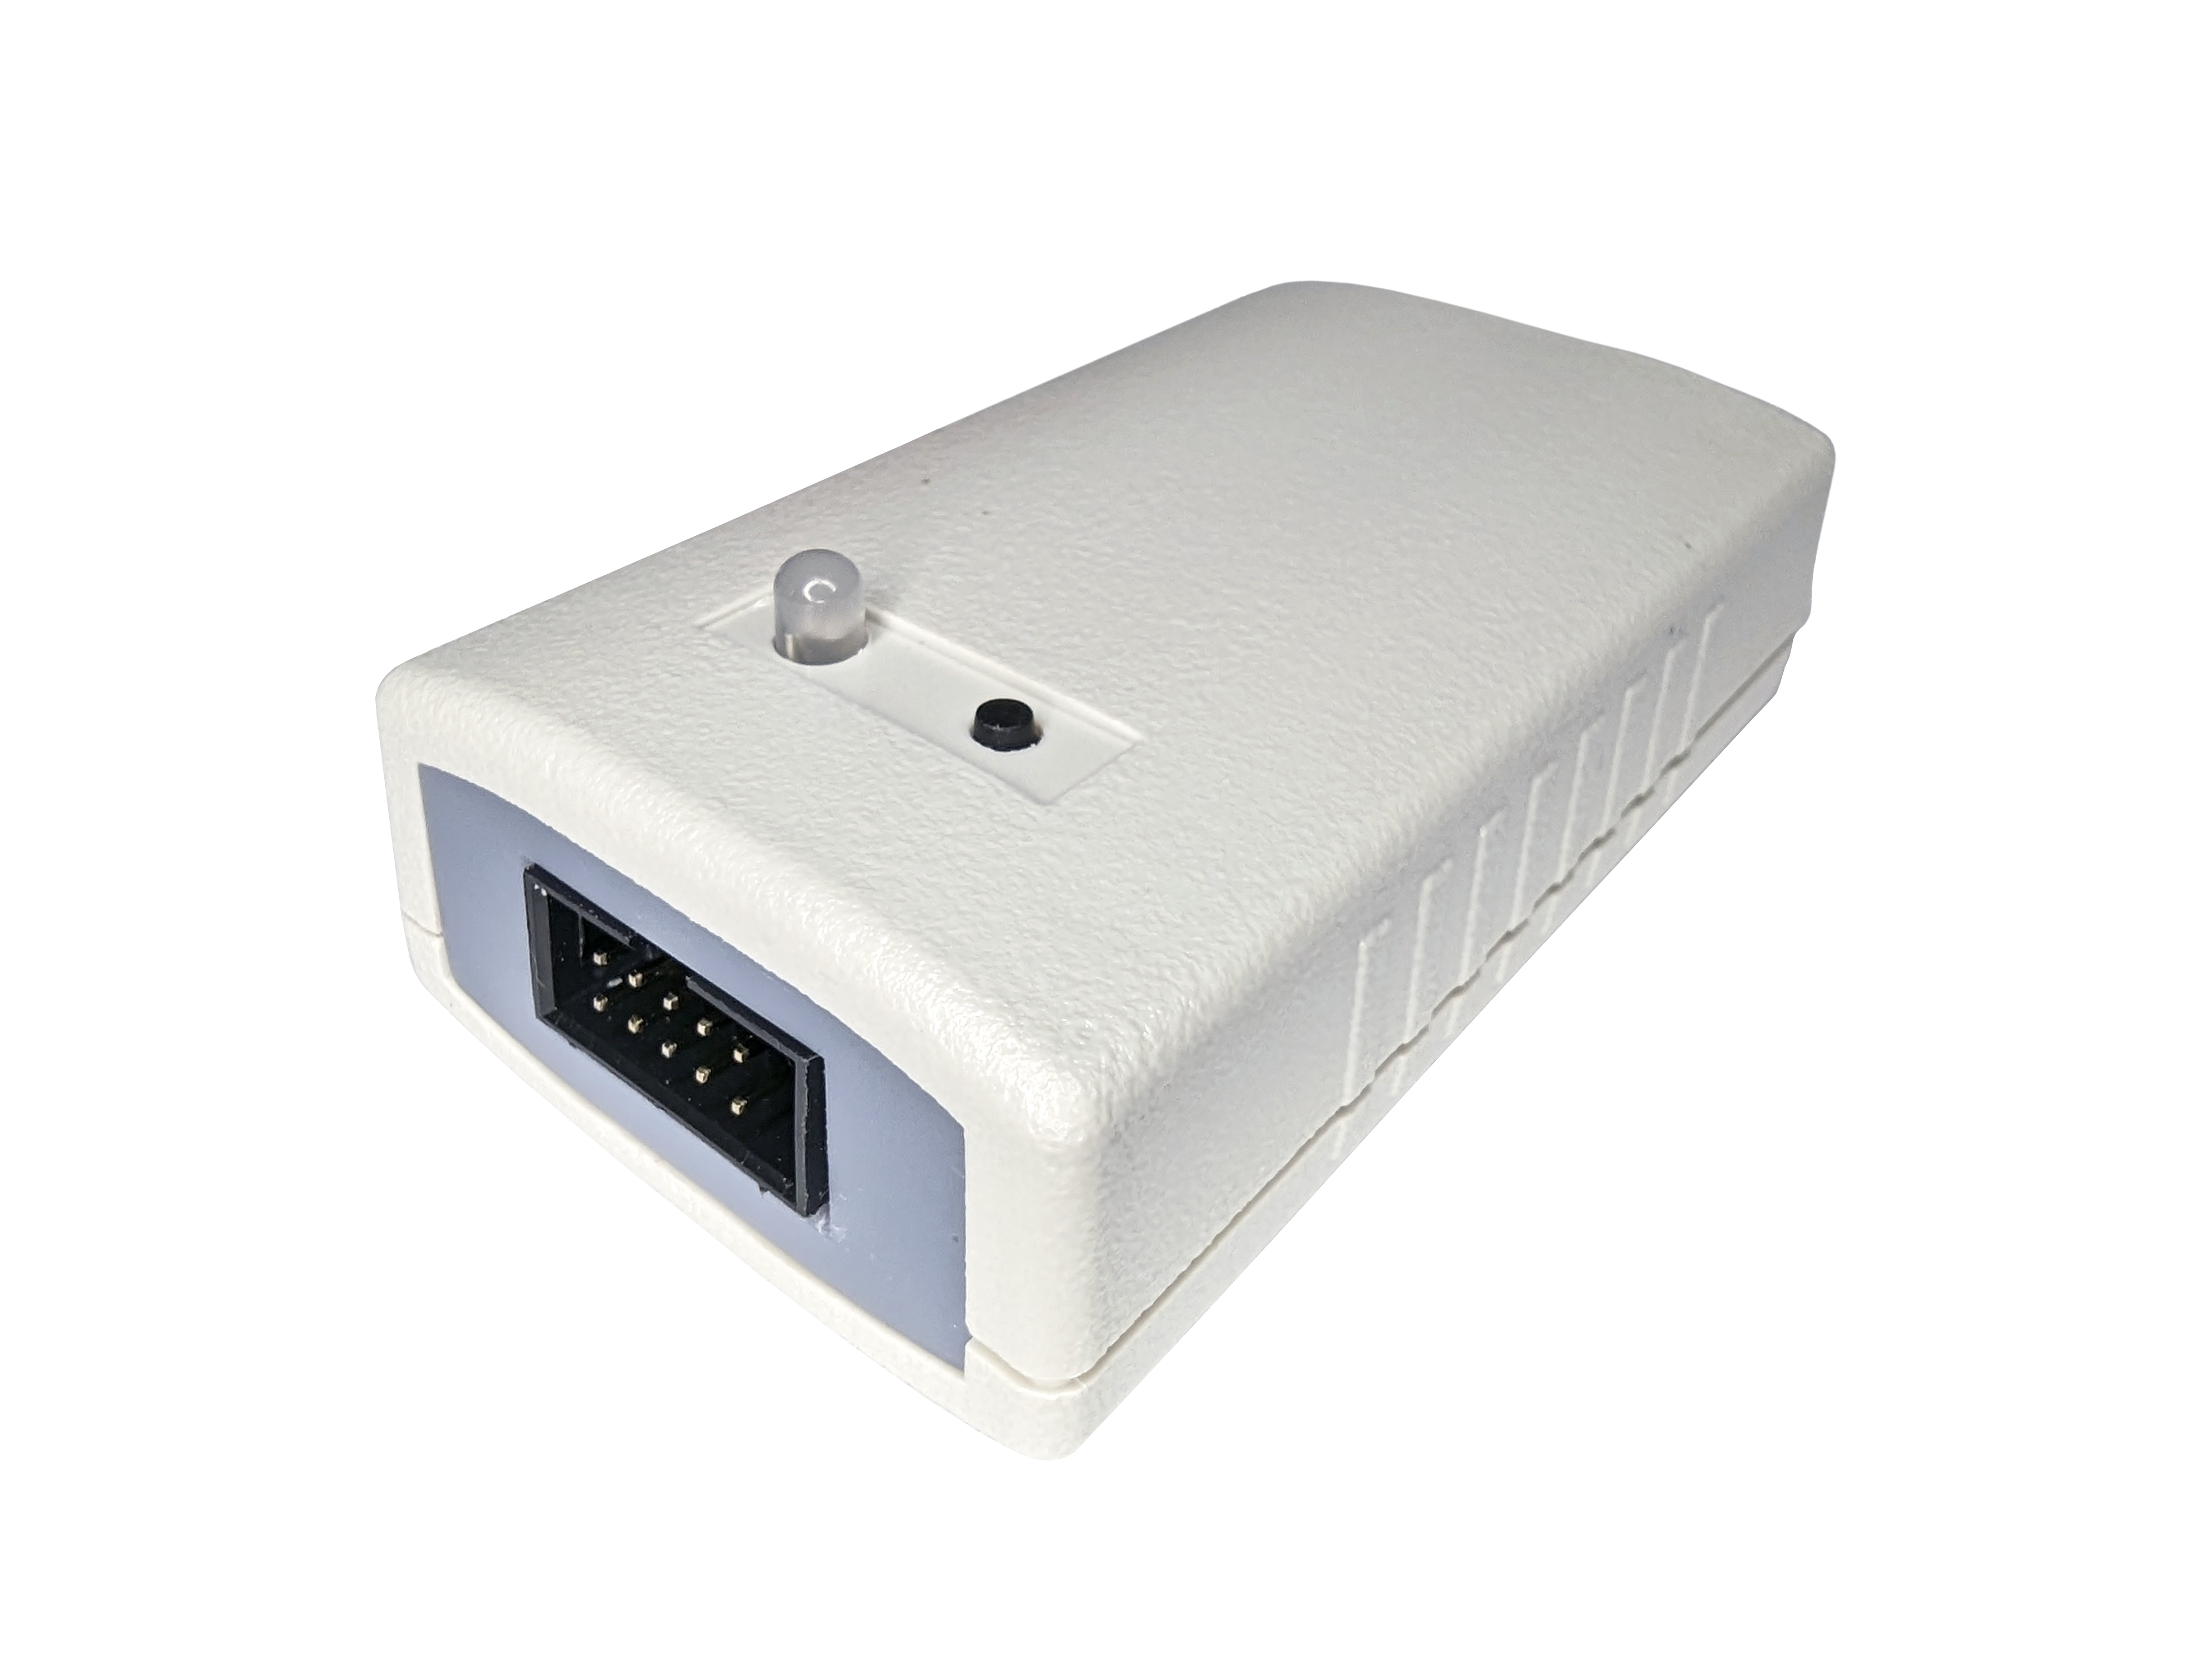
The front panel of the programmer has one programming port with IDC-10 male 10-pins (2x5) connector with pitch 2.54 mm.
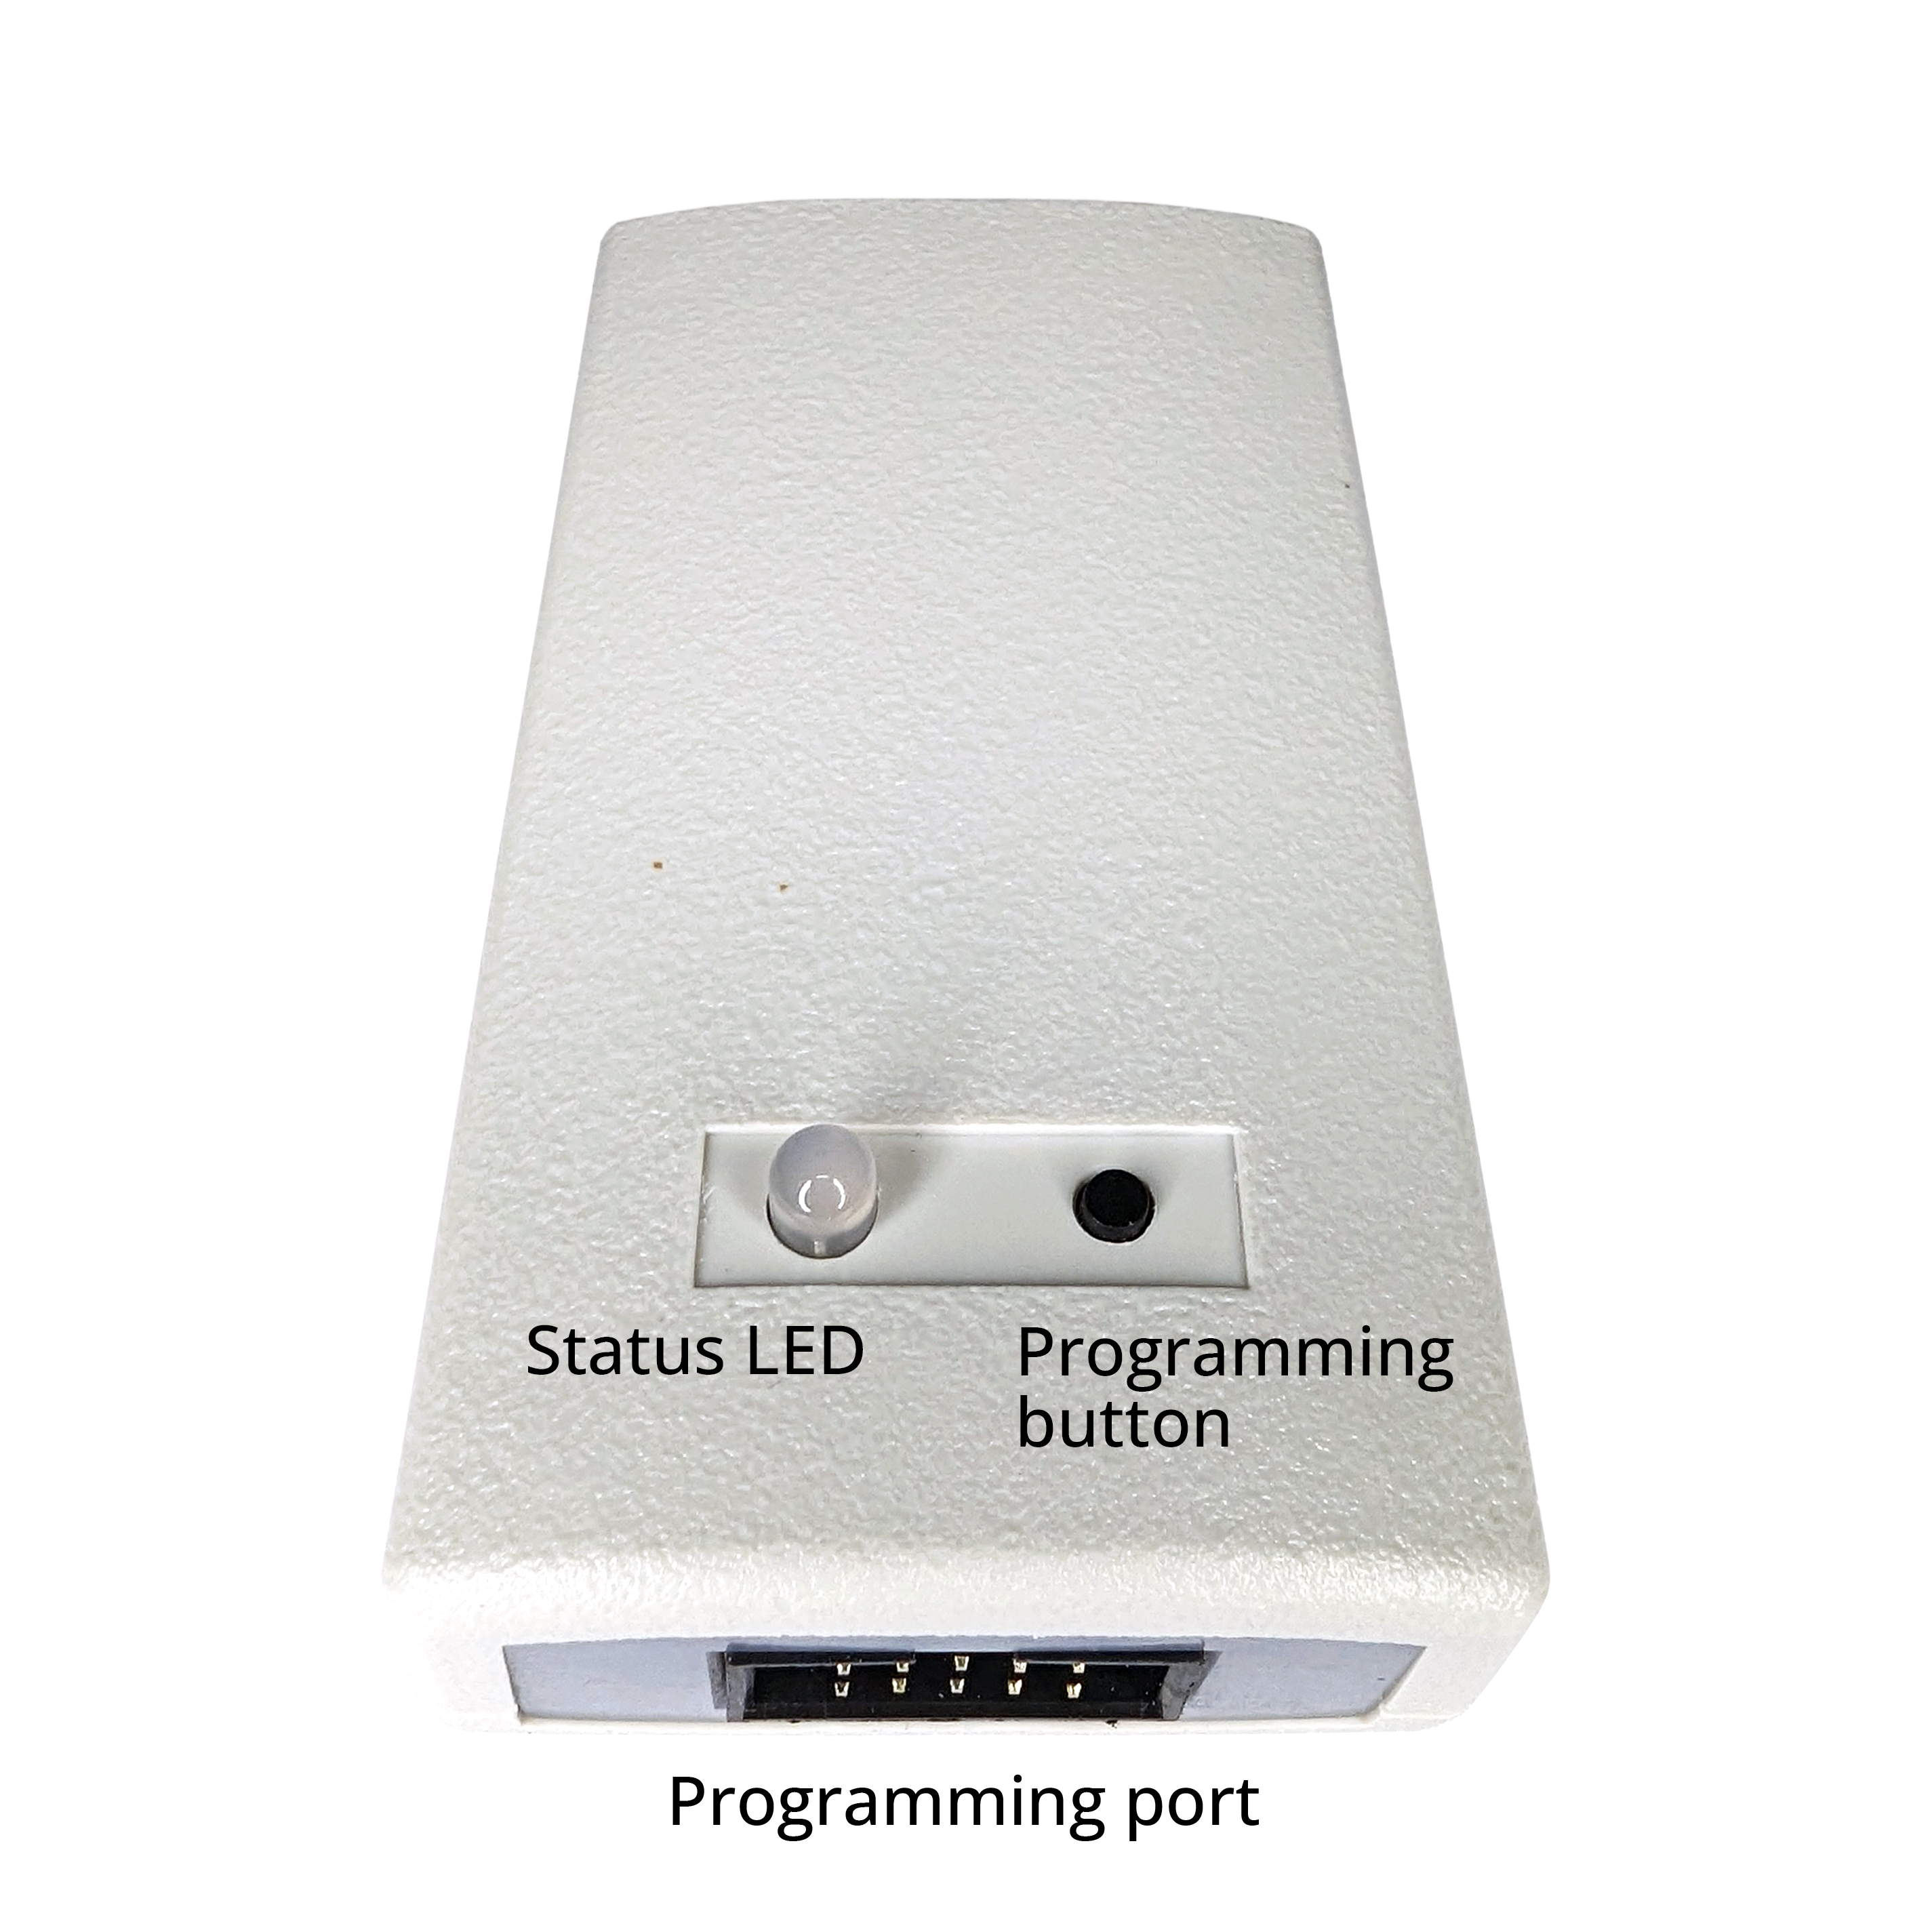
On the top panel there is a status LED and a programming button. You can configure how the button works using the command Button set
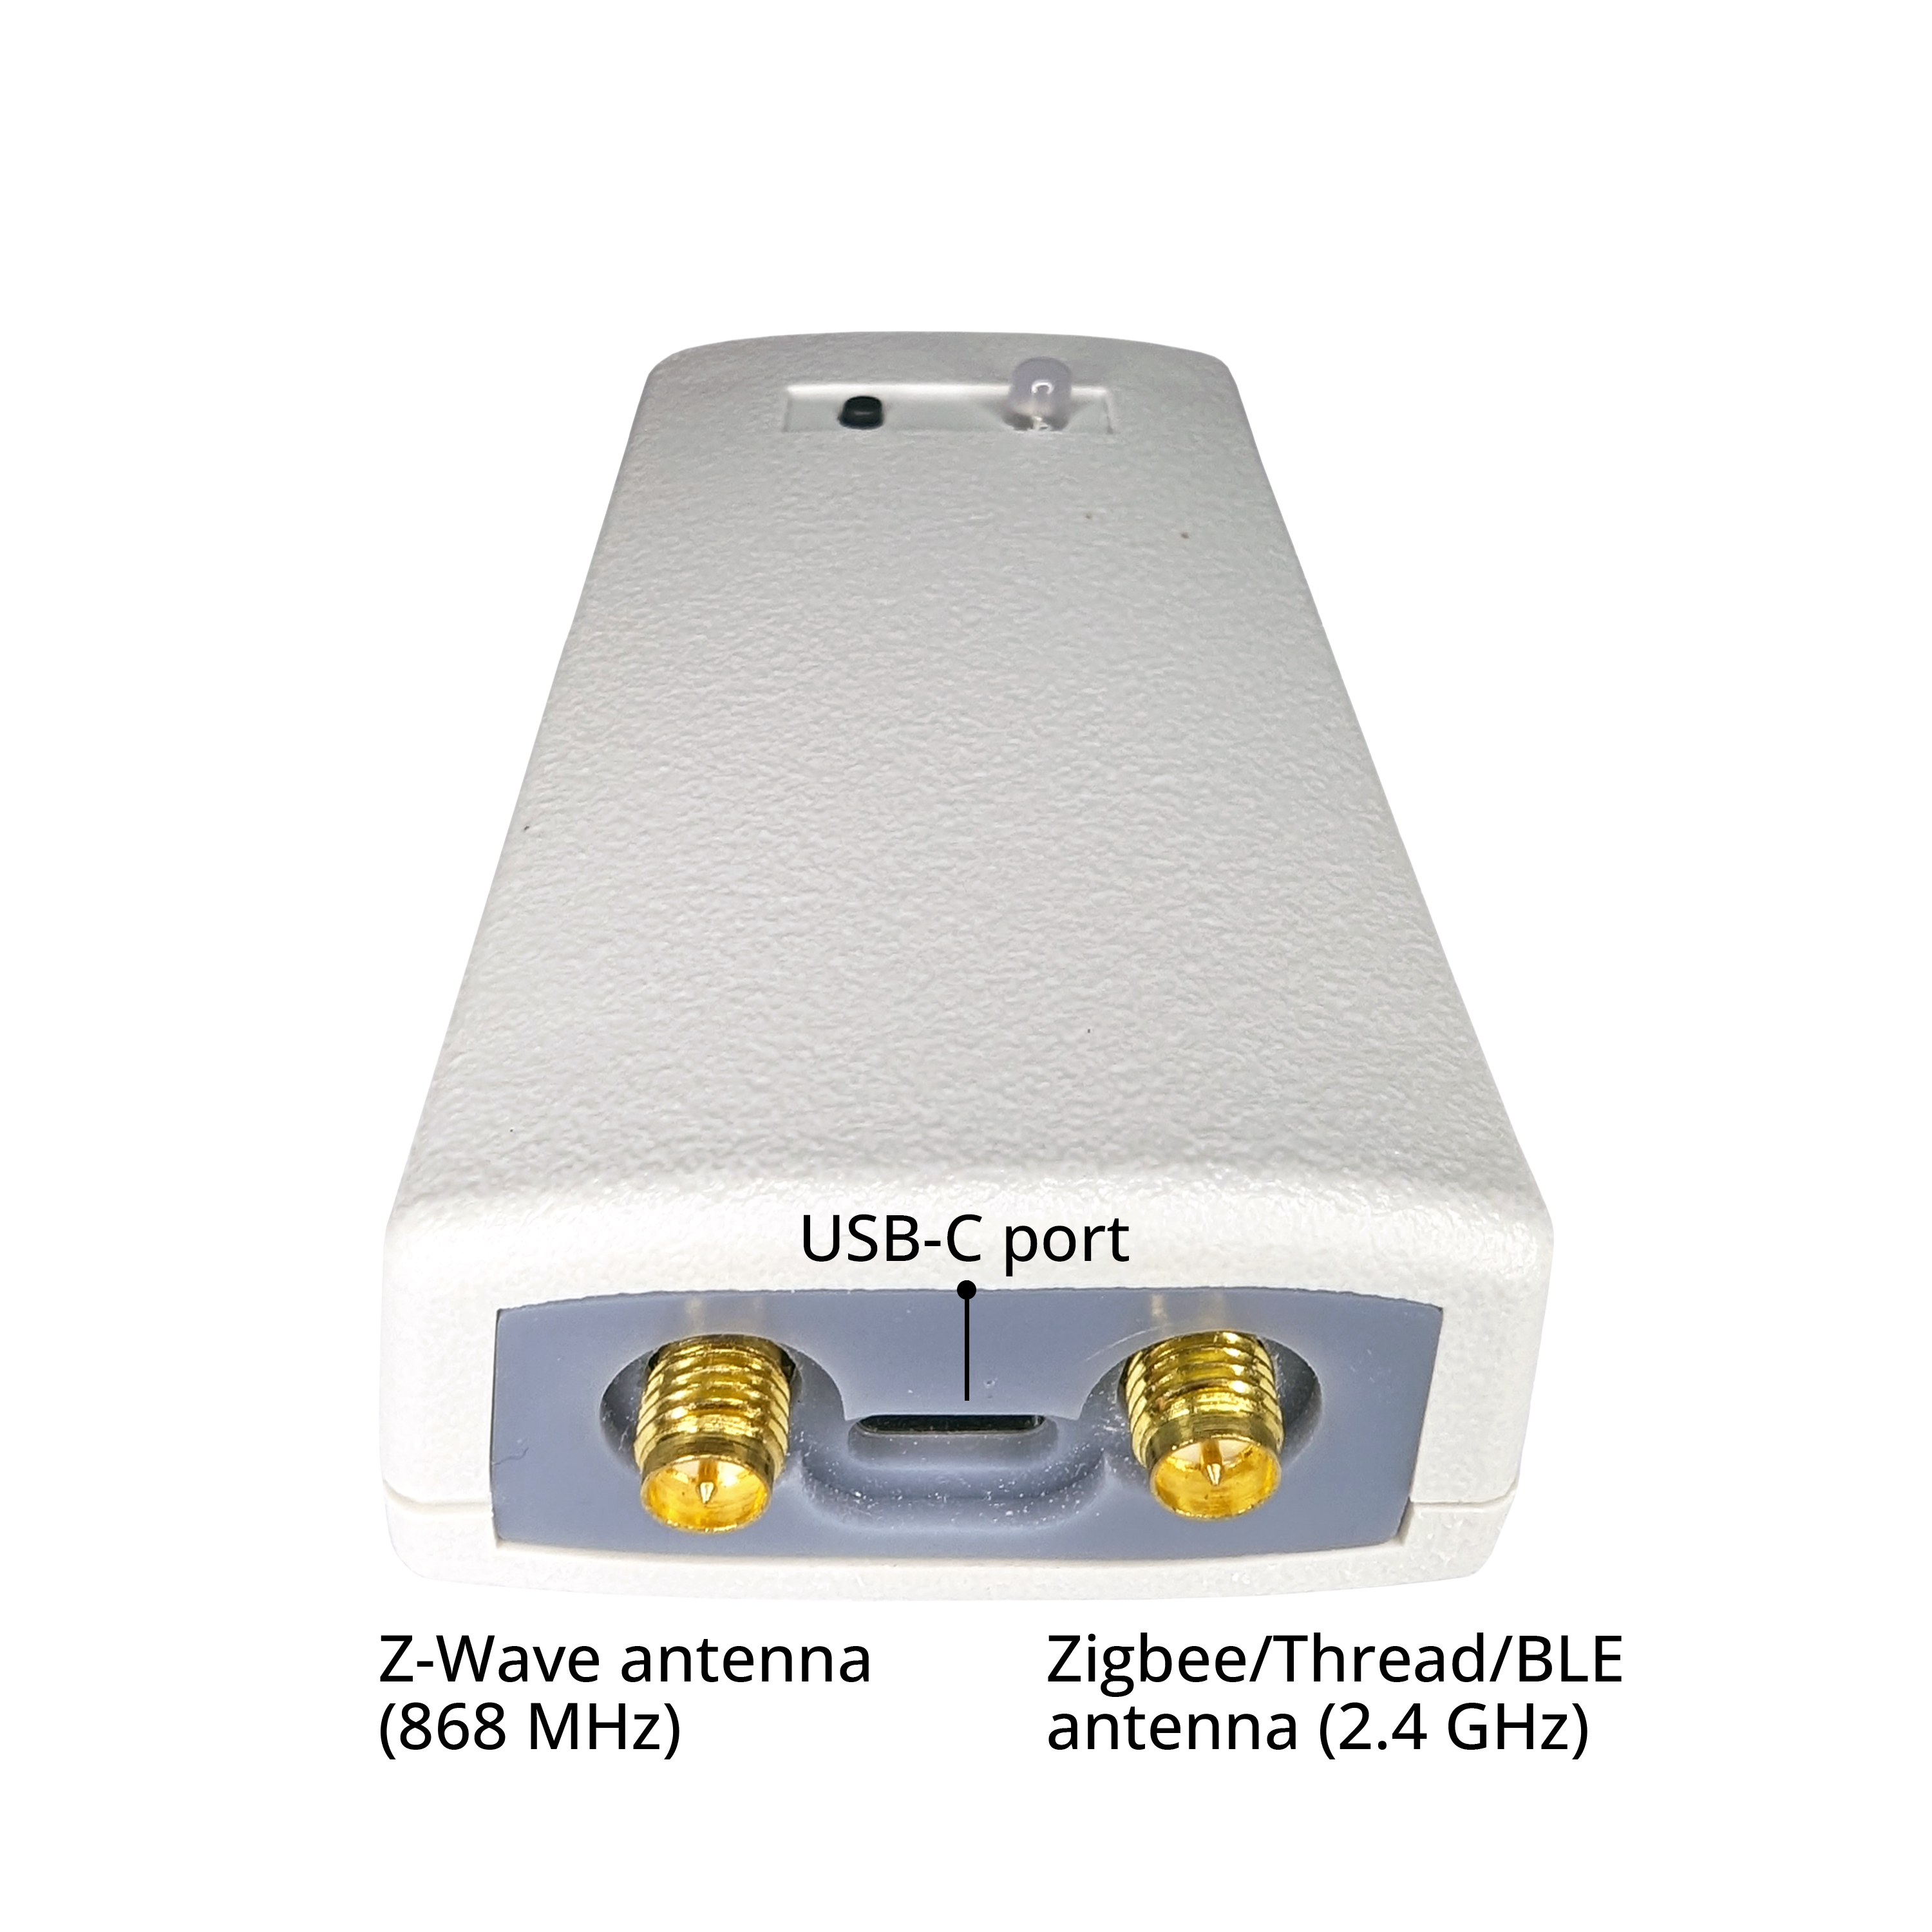
The back panel has a USB-C port. This port is used to power the programmer and to flash and upload firmware in the programmer when connected to a PC.
In addition, the programmer has two RP-SMA female connectors for 868/916 MHz (for Z-Wave) and 2.4 GHz antennas (for Zigbee, Thread and BLE). Those antennas are used for production test and as an RF sniffer.
Programming port pinout
The programming cable connector has an IDC-10 female connector on one side. The other side of it should be adjusted to your device depending on the programming pads on the PCB. The programmer port is also compatible with the Tag Connect TC2050-IDC cable.
❗ It is important to keep the programming cable length as short as possible. The SWD and SWD/UART protocols used to program chips run on a very high speed. You can adjust the speed using the command Config speed
The programming port pinout configuration can be seen using the Pinout info command and customized using the Pinout set command. Default pinout is shown below:

Chip programming requires only SWDIO, SWCLK, RESET and GND. If power is not provided to the chip, VCC is also needed.
COM-ports
When connected through USB, the programmer provides 4 COM-ports (appears as ttyUSB0-4 on Linux). Ports of the programmer:
Port |
Description |
|---|---|
ttyUSB0 |
Z-Wave controller |
ttyUSB1 |
Z-Wave sniffer (PTI) |
ttyUSB2 |
Programming interface and Zigbee controller |
ttyUSB3 |
Zigbee sniffer (PTI) |
Status LED
The status LED shows the programmer current status and operation progress
LED status |
Visualized |
Description |
|---|---|---|
Steady blue |
●●●● |
Ready |
Steady orange |
●●●● |
Ready, but there are some problems with the hardware |
Blinking green |
●○●○ |
Flahing in progress |
Steady red |
●●●● |
Error flashing |
Blinking blue |
●○●○ |
Boot mode |
Off |
○○○○ |
Programmer is not powered |
Programming button
You can configure the button action using the command Button set
Create a preset with a command Preset set and assigning it to the button Button set - this will allow you to initiate flashing using the button bypassing the terminal.
Z-Wave.Me software installation
Usage
The programmer software has multiple functions.
Get the list of available commands:zme_prog7 -h
Get specific parameters for each command:zme_prog7 <command> -h
Common options for most commands:
Option |
Description |
Values |
|---|---|---|
-d --device |
Device file (Unix) or COM-port (Windows) |
/dev/ttyUSB2 |
-b --baudrate |
Baud rate - it is not necessary to indicate there is an auto search for the required speed |
230400, 460800, 921600 |
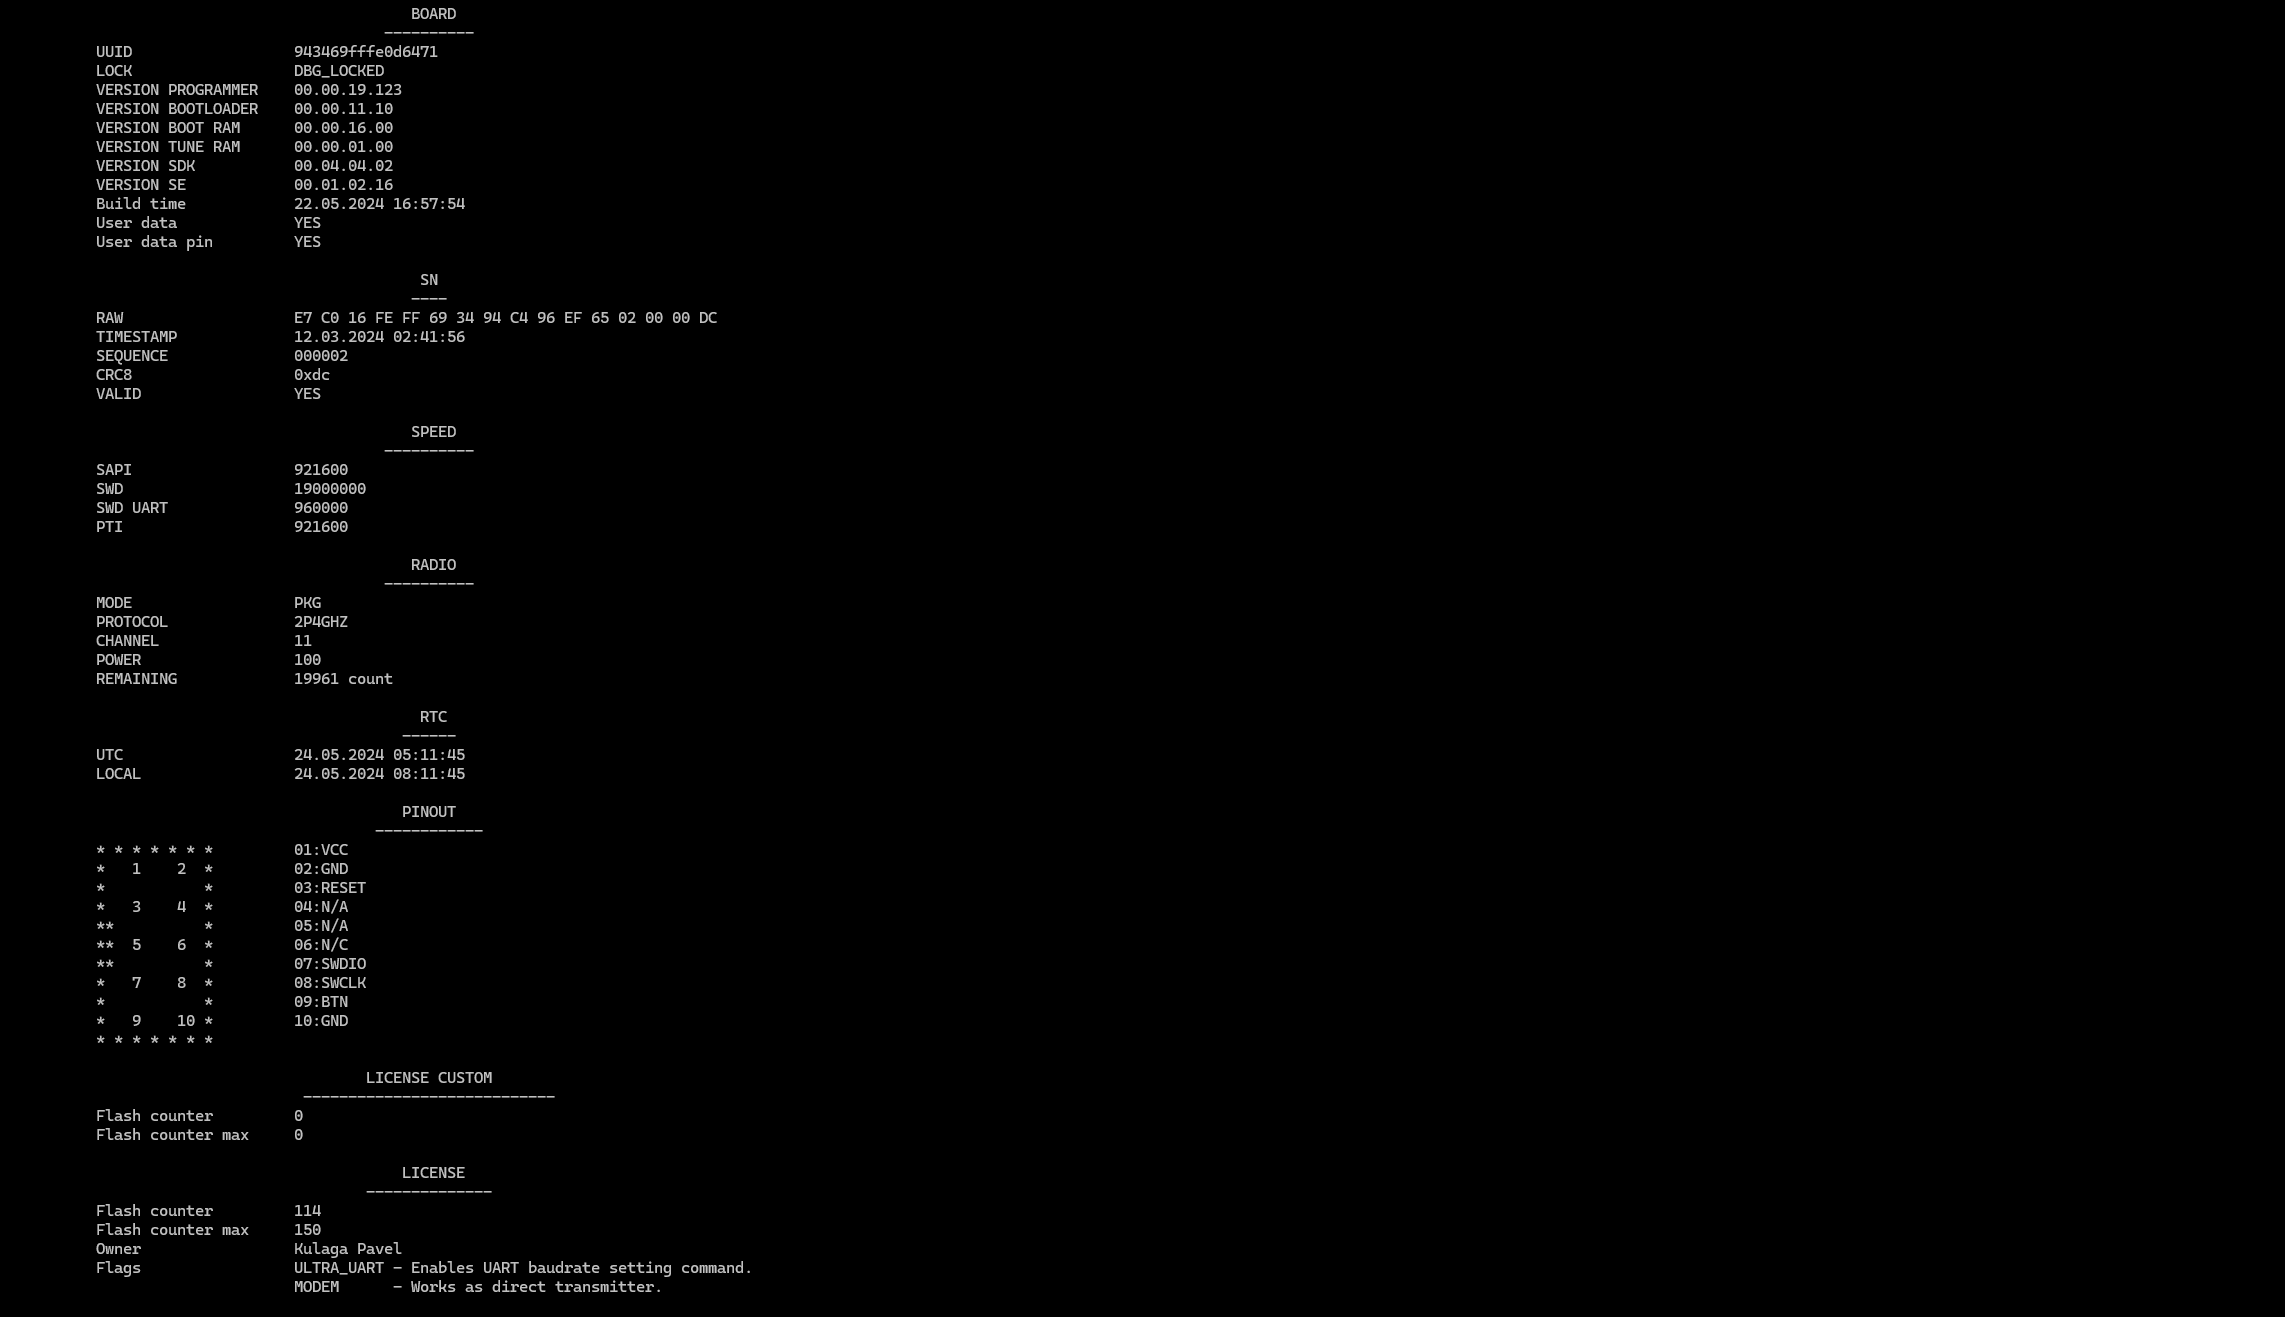
Info
Show programmer device information:zme_prog7 info -d --device [-b --baudrate]
Group |
Description |
Values |
||||||||||||||||
|---|---|---|---|---|---|---|---|---|---|---|---|---|---|---|---|---|---|---|
BOARD |
General information about the programmer |
|
||||||||||||||||
SN |
Serial number of the programmer |
|||||||||||||||||
SPEED |
The current programmer interface speed settings, you can configure it using Config speed |
|
||||||||||||||||
RADIO |
Shows of current radio status |
|
||||||||||||||||
RTC |
Shows information about the time configured using the RTC set command |
|
||||||||||||||||
PINOUT |
Reflects the actual setting of your IDC-10. You can configure it using Pinout set |
|
||||||||||||||||
LICENSE CUSTOM |
Information about the permission to flash your firmware granted to the user (factory). You can install your license using the command License custom, having previously generated using License custom generate |
|
||||||||||||||||
LICENSE |
Information about your permission to flash Z-Wave.Me firmwares. You can install this license using the command License |
|
Chip info
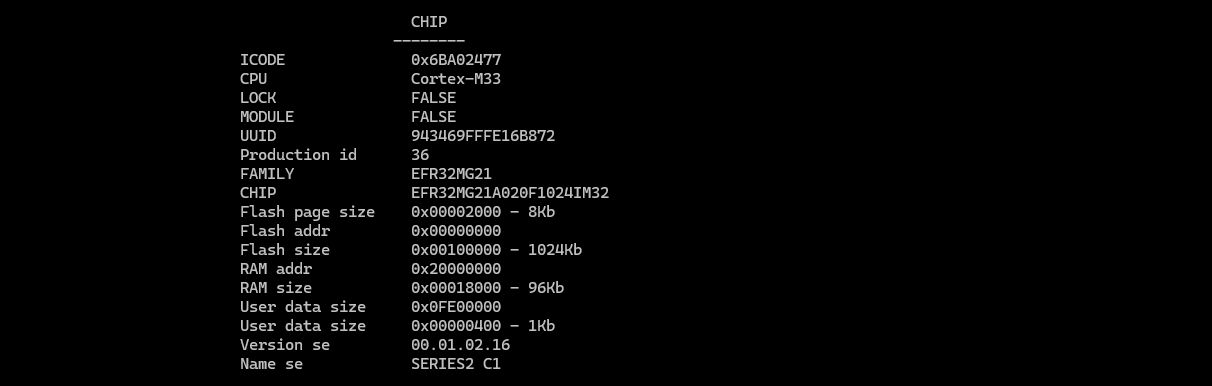
Shows information about the chip connected via SWD to the programmer:zme_prog7 chipInfo -d --device [-b --baudrate]
Chip support
Displays the list of chips that you can work with. If you do not specify [-d --device] it will display chips supported by zme_prog7:zme_prog7 chipSupport [-d --device] [-b --baudrate]
Chip lock
Lock the connected chip to prevent read-back of the firmware:zme_prog7 chipLock -d --device [-b --baudrate]
After locking the chip, the programmer will not be able to work with the chip anymore. To unlock the chip back, use: Chip unlock. Unlocking will erase the existing firmware from the chip.
After locking the chip, if you use Chip info, you will see:

Chip unlock
Unlock the connected device:zme_prog7 chipUnlock -d --device [-b --baudrate]
After this, the programmer will be able to fully work with the chip
❗This command will delete almost all chip data - be careful
Chip reboot
Reboot the connected device:zme_prog7 chipReboot -d --device [-b --baudrate]
Performs a hard reboot of the connected chip. For this action, the RESET pin is used. For more details check the Programming port pinout
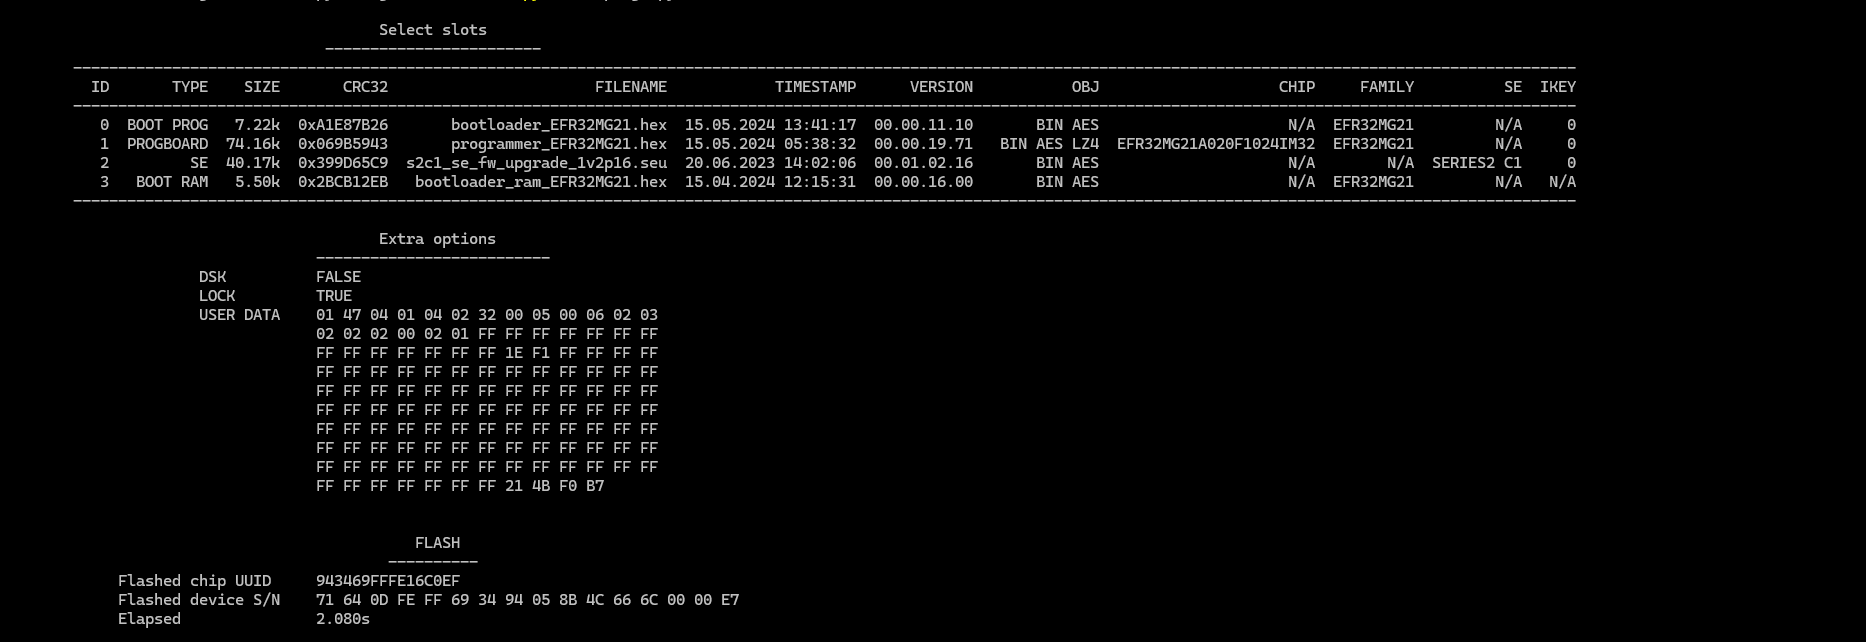
Slot info
Prints available and occupied slots of the programmer:zme_prog7 slotInfo -d --device [-b --baudrate]
You can load into slots using Slot store, reset their contents Slot reset

Slot store
Loads signed image into a slot of the programmer:zme_prog7 slotStore <filename> -d --device [-b --baudrate] [-i --index]
Option |
Description |
Values |
|
|---|---|---|---|
filename |
Path to the pkzme file you want to load into the slot |
pkzme the file can be obtained from Z-Wave.Me or you can create it yourself using File sign |
A zip file with multiple pkzme files can be used - in this case all, files will be loaded to available slots. |
-i --index |
Index of the slot where you want to load the pkzme file If not specified, the first available index is used. If specified, the previous slot content will be overwritten. If there is not enough free space or no suitable keys to decrypt the image, it will give an error. To install the key to successfully download pkzme use the command Key store |
from 0 to 255 |
Slot reset
Clears slots previously written using the command Slot store, You can see which slots are used Slot info:zme_prog7 slotReset -d --device [-b --baudrate] [-i --index]
❗Be careful all data is permanently deleted
Option |
Description |
Values |
|---|---|---|
-i --index |
If are not specified have not specified, then all slots will be deleted, otherwise only the specified slot |
from 0 to 255 |
Key info
Shows all available keys:zme_prog7 keyInfo -d --device [-b --baudrate]
You can download the key using Key store, or delete the command Key reset

Key store
Loads keys into your programmer for loading pkzme files using the command Slot store:zme_prog7 keyStore <package> -d --device [-b --baudrate] [-i --index]
Option |
Description |
Values |
|---|---|---|
package |
Key for loading into the pkzme programmer The key can be obtained from Z-Wave.Me or you can generate it yourself using the command Key generate |
hex string |
-i --index |
If not specified, it will be loaded into the first free slot ❗When overriding a key that is already in the slot with a new one, all pkzme files associated with this previous key will be deleted |
from 0 to 15 |
Key reset
Removes keys:zme_prog7 keyReset -d --device [-b --baudrate] [-i --index]
Option |
Description |
Values |
|---|---|---|
-i --index |
If are not specified have not specified, all keys will be deleted ❗When deleting a key/keys, all pkzme files associated with this key/keys will be deleted |
from 0 to 15 |
Key generate
Creates a hex string representing the key for pkzme signing:zme_prog7 keyGen <uuid> -p --profile -k --key [-b --baudrate]
Option |
Description |
Values |
|---|---|---|
uuid |
The UUID of your programmer |
hex string |
-p --profile |
The key file that was used to create pkzme files You can create it using the command File generate key |
|
-k --key |
Your personal key, which will be received with the license, is tied to your programmer |
hex string |
Update
Checks for new version and, if necessary, update this software:zme_prog7 update [-p --profile] -d --device [-b --baudrate]
Option |
Description |
Values |
|---|---|---|
-p --profile |
Pointer to a local file with update lists |

Erase Page
Erase area in the flash memory of the connected chip:zme_prog7 erasePage -a --address -l --length -d --device [-b --baudrate]
❗Data is permanently deleted
Option |
Description |
|---|---|
-a --address |
The start address of the flash memory to be erased. It must be a multiple of the size of the flash page You can find out the size of the flash page of the chip using the command Chip info - Flash page size |
-l --length |
The size of the flash memory area you want to erase. It must be a multiple of the flash page size. If the flash area itself is smaller than the size of the flash page, then you need to indicate the actual size You can find out the size of the flash page of the chip using the command Chip info - Flash page size |
Erase Mass
Erase the main flash memory of the connected chip:zme_prog7 eraseMass -d --device [-b --baudrate]
You can see the structure of flash memory using Chip info - This command will clear the memory Flash address and size Flash size
❗Data is permanently deleted
Flash Data
Allows you to write data to the flash of the connected chip:zme_prog7 flashData -a --address -da --data -d --device [-b --baudrate]
If you already have data on the flash memory, you might need to erase it first. It is only possible to override data from 1 to 0, but not from 0 to 1. In the latter case, you will need to erase first using Erase Page or Erase Mass
Option |
Description |
|---|---|
-a --address |
Any valid address of the flash memory of the chip, you can see the available flash memory of the chip using Chip info |
-da --data |
Valid hex data string. Does not exceed the available flash memory area |
Flash read
Allows you to read the contents of the flash memory of the connected chip with the ability to display it in a terminal or save it to a file:zme_prog7 flashRead -a --address -l --length -d --device [-o --outFile] [-b --baudrate]
❗It is not possible to read flash memory if the chip was locked
Option |
Description |
|---|---|
-a --address |
Any valid address of the flash memory of the chip, you can see the available flash memory of the chip using Chip info |
-l --length |
The size of the memory you want to read, you can see the available flash memory of the chip using Chip info |
-o --outFile |
Path to the file to which the read data will be saved. If not specified, it will be printed to the terminal The data will be saved in binary form |
Flash file
Write file content into the flash memory of the connected device:zme_prog7 flashFile <filename> -d --device [-a --address] [-b --baudrate]
Check examples of usage for more info.
Option |
Description |
|---|---|
filename |
Flash a binary file in .bin or .hex format into the connected device You can also flash the key generated earlier using the command File generate key |
-a --address |
Any valid address of the flash memory of the chip, you can see the available flash memory of the chip using Chip info This only needs to be specified for .bin files. |
Flash product
Flashes the connected programmer using the firmware loaded into the programmer with the command Slot store:zme_prog7 flashProduct -d --device [-b --baudrate] [-fi --firmwareIndex] [-bi --bootloaderIndex] [-ki --keyIndex] [-sei --seIndex] [-c --chip] [-u --userData] [-o --options] [-qr --qrCodeDir] [-dp --deviceProfile]
If the firmware downloaded by Slot store was encrypted, then the number of times you can flash it is limited by the license
If you don’t explicitly specify all or some of the parameters, it will try to select it yourself
Logging is also carried out into external flash memory; you can view the contents of the log using the command Log info
Option |
Description |
Values |
||||
|---|---|---|---|---|---|---|
-fi --firmwareIndex |
Firmware slot index - the main firmware file |
0 ... 255 |
||||
-bi --bootloaderIndex |
Bootloader slot index - a bootloader that allows to run and update the main firmware |
0 ... 255 |
||||
-sei --seIndex |
Secure Engine slot index (required for some chips) |
0 ... 255 |
||||
-ki --keyIndex |
Key slot index |
0 ... 255 |
||||
-c --chip |
Type of chip being flashed, you can see all supported chips using Chip support |
|||||
-o --options |
Additional options for customizing firmware |
|
||||
-u --userData |
Defines custom user data as a hex-encoded string (requires support in the firmware flashed). |
|||||
-qr --qrCodeDir |
Output SmartStart QR-code dir (used in conjunction with -o DSK) |
|||||
-dp --deviceProfile |
Specifies product profile for the QR-code generation (only used in conjunction with -o DSK) |
Config speed
Set the communication speed with the programmer:zme_prog7 configSpeed -d --device [-sapi --sapi] [-swd --swd] [-uart --uart] [-pti --pti] [-b --baudrate]
Option |
Description |
Values |
|---|---|---|
-sapi --sapi |
230400, 460800 and 921600 |
|
-swd --swd |
❗At high speeds, you need to pay attention to the length and the quality of the cable |
1024000 to 19000000 |
-uart --uart |
❗At high speeds, you need to pay attention to the length and the quality of the cable |
960000 to 2500000 |
-pti --pti |
230400, 460800 and 921600 |
License
Load a Z-Wave.Me license package in the programmer:zme_prog7 lic <package> -d --device [-b --baudrate]
You can see the current license status LICENSE
Check examples of using for use cases
License custom
Load a custom license package in the programmer:zme_prog7 licCustom <package> -d --device [-b --baudrate]
The package can be generated using the command License custom generate
You can see the current license status LICENSE CUSTOM
License custom generate
Generate a custom license package in the programmer:zme_prog7 licCustomGen <uuid> -d --device [-b --baudrate]
You can see the current license status LICENSE CUSTOM
You can install the newly generated license using the command License custom
Option |
Description |
Values |
|---|---|---|
uuid |
The UUID of your programmer |
hex string |
-cm --countMax |
Max programming counter |
0 ... 4294967295 |
-k --key |
Your personal key, which will be received with the license, is tied to your programmer |
hex string |
File info
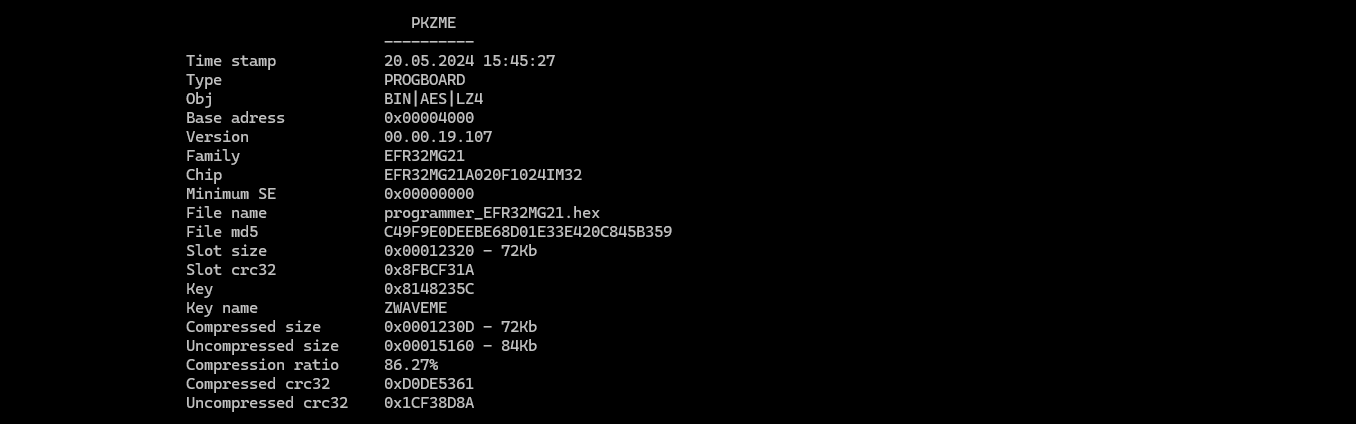
Show the pkzme file info:zme_prog7 fileInfo <filename> -d --device
Path to the pkzme file you want to get information about
You can create your own pkzme file using File sign To do this, you will first need to create your key using File generate key
File sign
Allows you to create a pkzme file from firmware (compiled using SiLabs SDK) using your created key File generate key:zme_prog7 fileSign <filename> -c --chip -obj --pkzmeObj -d --device [-o --output] [-p --profile] [-b --baseAddr] [-sv --seVersion]
Option |
Description |
Values |
Default |
|---|---|---|---|
filename |
Path to the file from which you want to make a pkzme file Supports hex or bin type files based on SiLabs |
||
-c --chip |
Type of chip being flashed, you can see all supported chips using Chip support |
||
-obj --pkzmeObj |
Property of the created pkzme file - regular firmware file hex or bin type Silabs |
BIN | |
-obj --pkzmeObj |
Property of the created pkzme file - use encryption when creating, when specifying this parameter, you must specify the key via -p --profile |
AES | |
-obj --pkzmeObj |
Property of the created pkzme file - compression is used to reduce the size and speed up stitching lz4 |
LZ4 | |
-o --output |
Path with name to the output file |
||
-p --profile |
Path to the key file created using the command File generate key - a required parameter for -obj AES |
||
-b --baseAddr |
The base address where the firmware should be located on the chip is mandatory in the case of bin files |
||
-sv --seVersion |
Minimum SE version with which the firmware can work |
0 |
File extract
Allows you to unpack previously created pkzme files, File sign:zme_prog7 fileExtract <filename> -d --device [-o --output] [-p --profile]
Option |
Description |
|---|---|
filename |
Path to the pkzme file you want to unpack |
-o --output |
Path with name to the output file. Otherwise, a folder will be created in the same directory where the file you want to unpack is located |
-p --profile |
Path to the key file created using the command File generate key Required parameter for pkzme files created File sign and with a flag -obj AES |
File generate key
Generates key files for files gbl and pkzme :zme_prog7 fileGenKey <path> -t --type -d --device
Option |
Description |
Values |
Default |
||||
|---|---|---|---|---|---|---|---|
path |
Path to the directory where the key files will be created |
||||||
-t --type |
Generated key type |
|
GBL |
Pinout set
Allows you to configure the IDC-10 programmer pinout:zme_prog7 pinoutSet -d --device [-b --baudrate] [-o --options] [-r --reset]
Option |
Description |
Values |
||||||||||
|---|---|---|---|---|---|---|---|---|---|---|---|---|
-o --options |
Format 'dd:text' A more detailed description of the values and the current values can be found using PINOUT Can be specified multiple times to assign functions to multiple pins in one command |
|
||||||||||
-r --reset |
Allows you to reset the IDC-10 programmer pinout settings to factory default |
true |
Button Info
Shows information about the actions assigned to the programmer button:zme_prog7 buttonInfo -d --device [-b --baudrate]
You can assign an action to a button to the programmer using the command Button Set

Button Set
Assigns an action to the programmer button:zme_prog7 buttonSet -a --action -d --device [-b --baudrate]
You can currently assigned function using the Button Info command
Option |
Description |
Values |
||||||
|---|---|---|---|---|---|---|---|---|
-a --action |
An action that can be assigned to a programmer button |
|
RTC set
Set time in the programmer to system time:zme_prog7 RTCSet -d --device [-b --baudrate] [-ts --timestamp]
This command should be used on each power on if the programmer have no battery inserted. To preserve the time over power cycle, the battery should be inserted.
You can see what time is currently set using RTC
Option |
Description |
|---|---|
-ts --timestamp |
If the option of automatically setting the current time does not suit you, then you can pass the UTC timestamp yourself as a number |
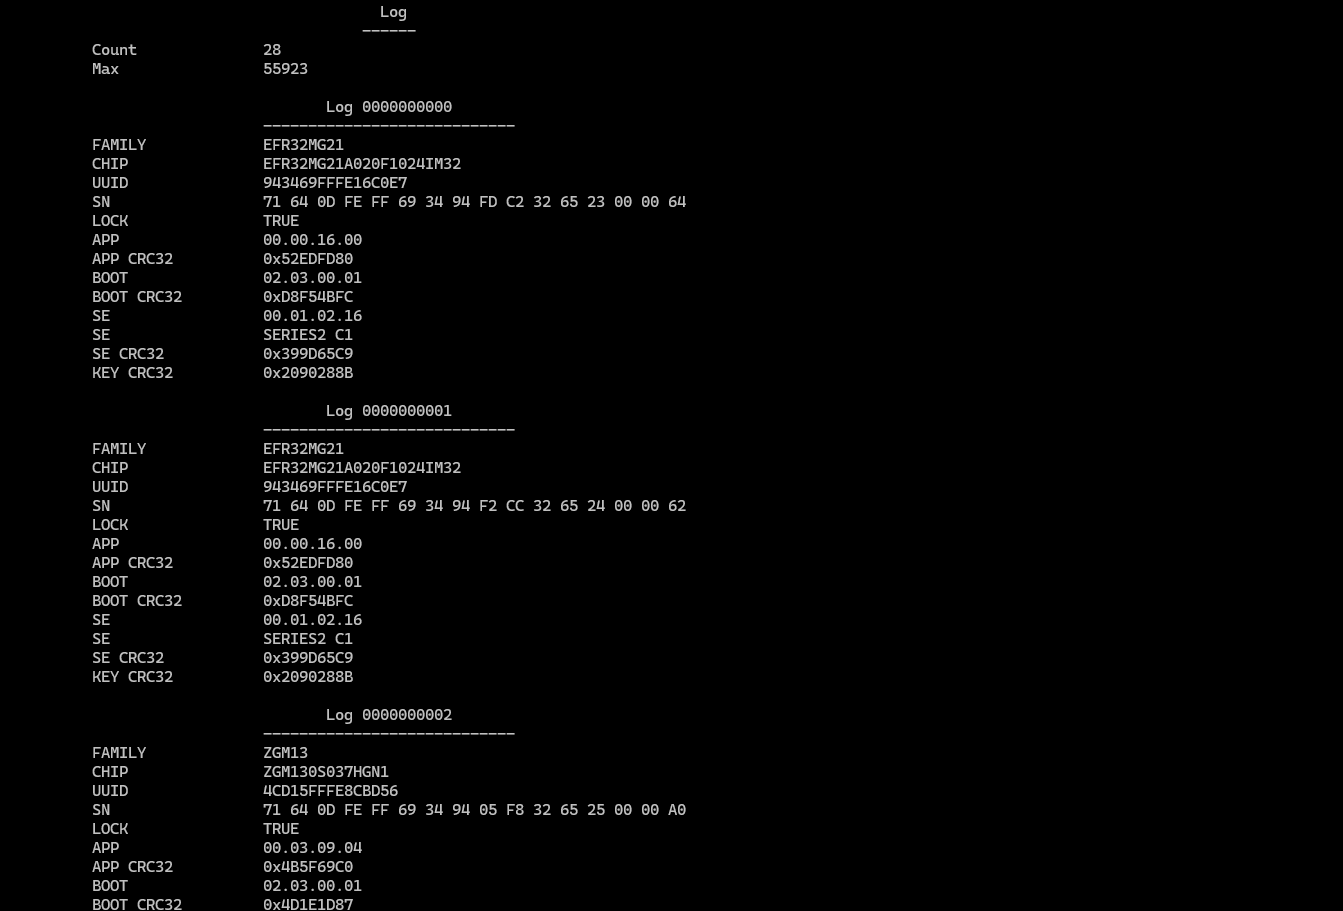
Log info
Displays log of the programmer:zme_prog7 logInfo -d --device [-b --baudrate] [-o --output]
Information is recorded during use Flash product and also when pressing the programmer button, if a similar action is assigned their Button Set
Option |
Description |
|---|---|
-o --output |
Path to the file where all output will be saved as a json file |
Log Reset
Reset the log file in the programmer:zme_prog7 logReset -d --device [-b --baudrate]
❗Be careful, the full log will be deleted so do not forget to save the log before using the Log info command
Preset Info
Shows all saved presets:zme_prog7 presetInfo -d --device [-b --baudrate]
You can install presets using Preset set
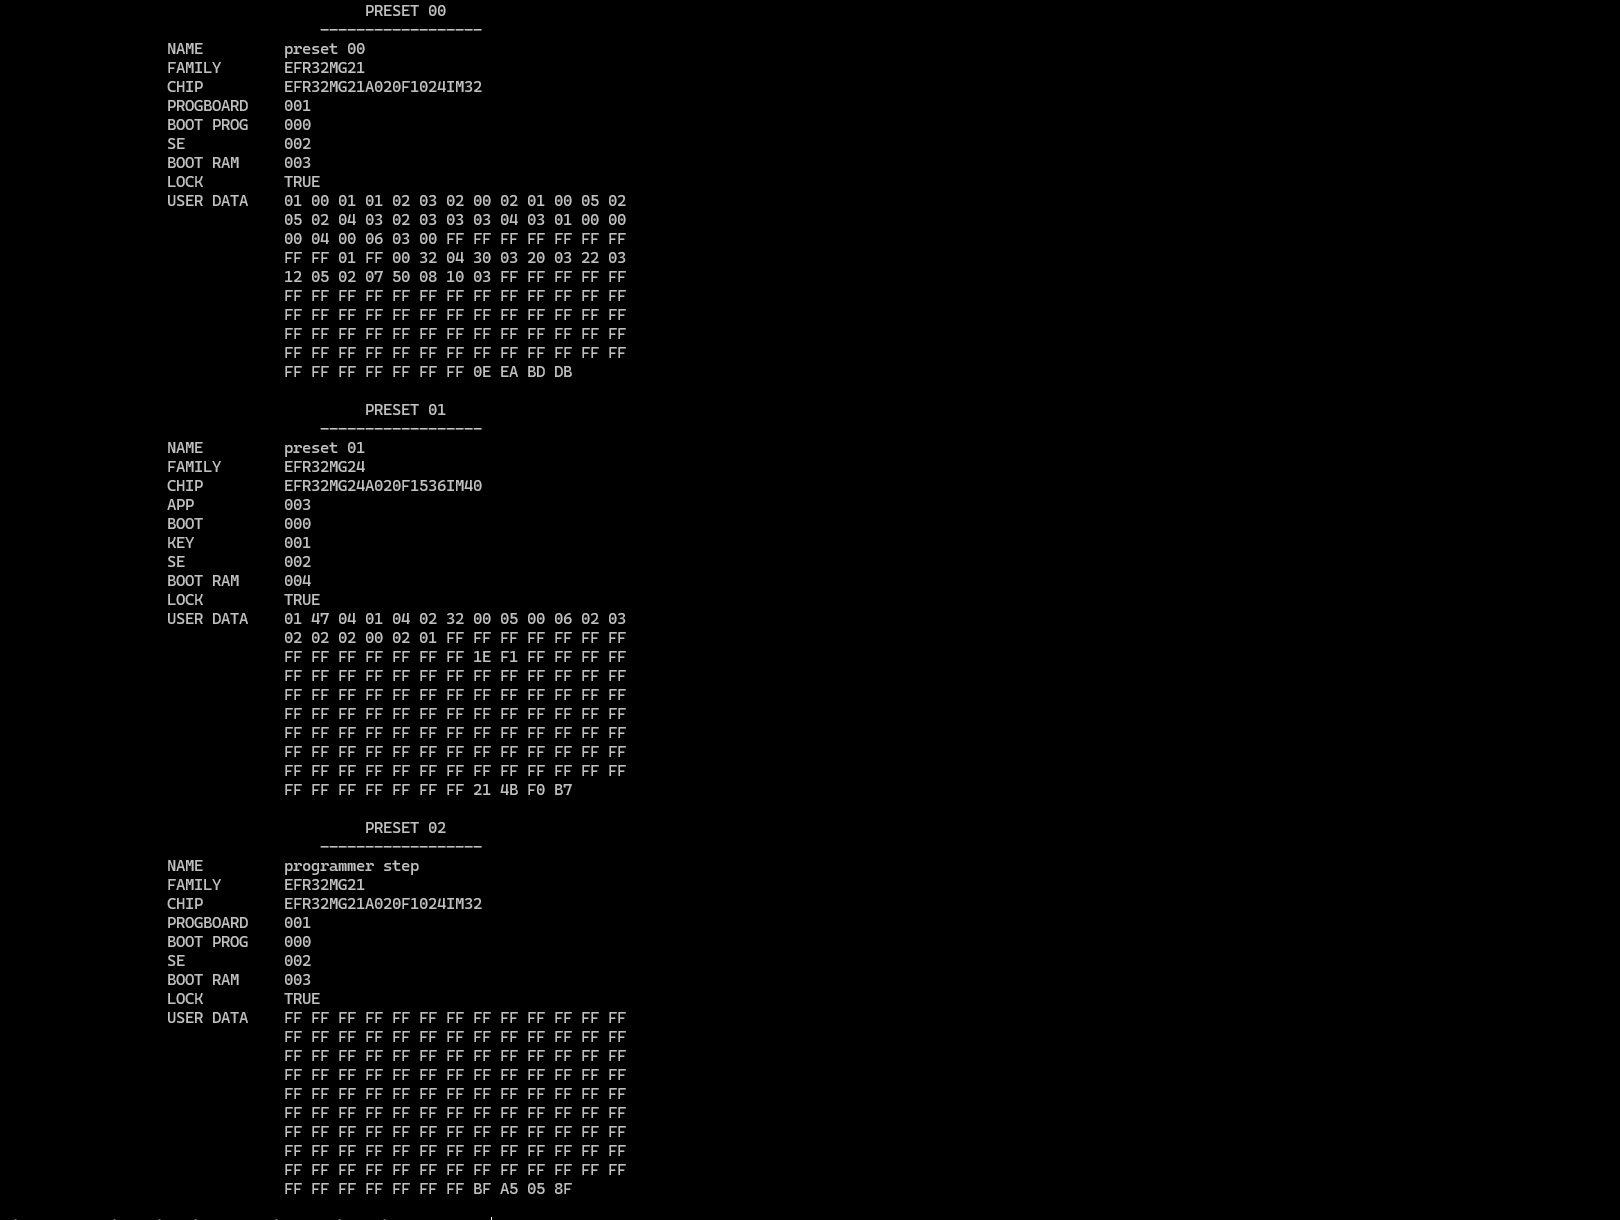
Preset Set
Generates a preset based on the firmware previously loaded into the programmers via the command Slot store:zme_prog7 presetSet -d --device [-b --baudrate]
[-fi --firmwareIndex] [-bi --bootloaderIndex]
[-ki --keyIndex] [-sei --seIndex] [-c --chip]
[-u --userData] [-o --options] [-i --index] [-n --name]
If you don’t explicitly specify all or some of the parameters, it will try to select it yourself
A total of 10 presets can be saved and used
You can assign presets to a button using Button Set
Option |
Description |
Values |
|---|---|---|
-i --index |
The index at which you want to save the preset If the index is not specified, it will be saved to the first free one; if there is none, it will return an error |
0 ... 9 |
-n --name |
If you do not specify a name, the default one will be used, it will be created in this form preset xx The name length cannot be more than 32 bytes |
|
-a --auto |
If you specify, the parameters will be selected depending on the chip connected to the programmer |
true |

Preset Reset
Resets presets installed via Preset Set:zme_prog7 presetReset -d --device [-b --baudrate] [-i --index] [-n --name]
If no [-i --index] or [-n --name] is specified, then it will delete all presets
Radio Test
Allows you to run the radio in different modes:zme_prog7 radioTest -m --mode -fr --freq -c --channel -p -power -t --timeout -d --device [-b --baudrate]
The command works asynchronously, that is, while the radio is operating, the programmer can execute other commands
You can see what state the radio is in now using RADIO
For more info, check examples of usage
Option |
Description |
Values |
Default |
||||||||||||||||||
|---|---|---|---|---|---|---|---|---|---|---|---|---|---|---|---|---|---|---|---|---|---|
-m --mode |
Transmission mode |
|
PKG |
||||||||||||||||||
-fr --freq |
Modulation type |
|
2P4GHZ |
||||||||||||||||||
-c --channel |
Channel number |
ZIGBEE, 2P4GHZ_ANTDIV_COEX, 2P4GHZ_COEX, 2P4GHZ_ANTDIV and 2P4GHZ from 11 to 26 BLE_CODED_125KBPS, BLE_CODED_500KBPS, BLE_1MBPS and BLE_2MBPS from 0 to 39 |
11 |
||||||||||||||||||
-p -power |
TX power. Units of measurement (raw) do not linearly affect signal strength. |
from 1 to 180 (raw) |
100 |
||||||||||||||||||
-t --timeout |
Turn off the test N milliseconds - used in any mode except MODEM |
from 0 to 4294967295 |
1000 |
Radio Send Packet
Allows you to send meaningful data while in MODEM mode:zme_prog7 radioSendPacked -p --packet-d --device [-b --baudrate]
-p --packet |
The data packet you wish to send over the radio |
hex string |
110E11223344550F778899AABBCCDDEE |
| -c --channel | The current channel specified using the Radio Test Channel command |
Radio Stop
Allows you to stop the radio:zme_prog7 radioStop -d --device [-b --baudrate]
You can start the radio using the command Radio Test
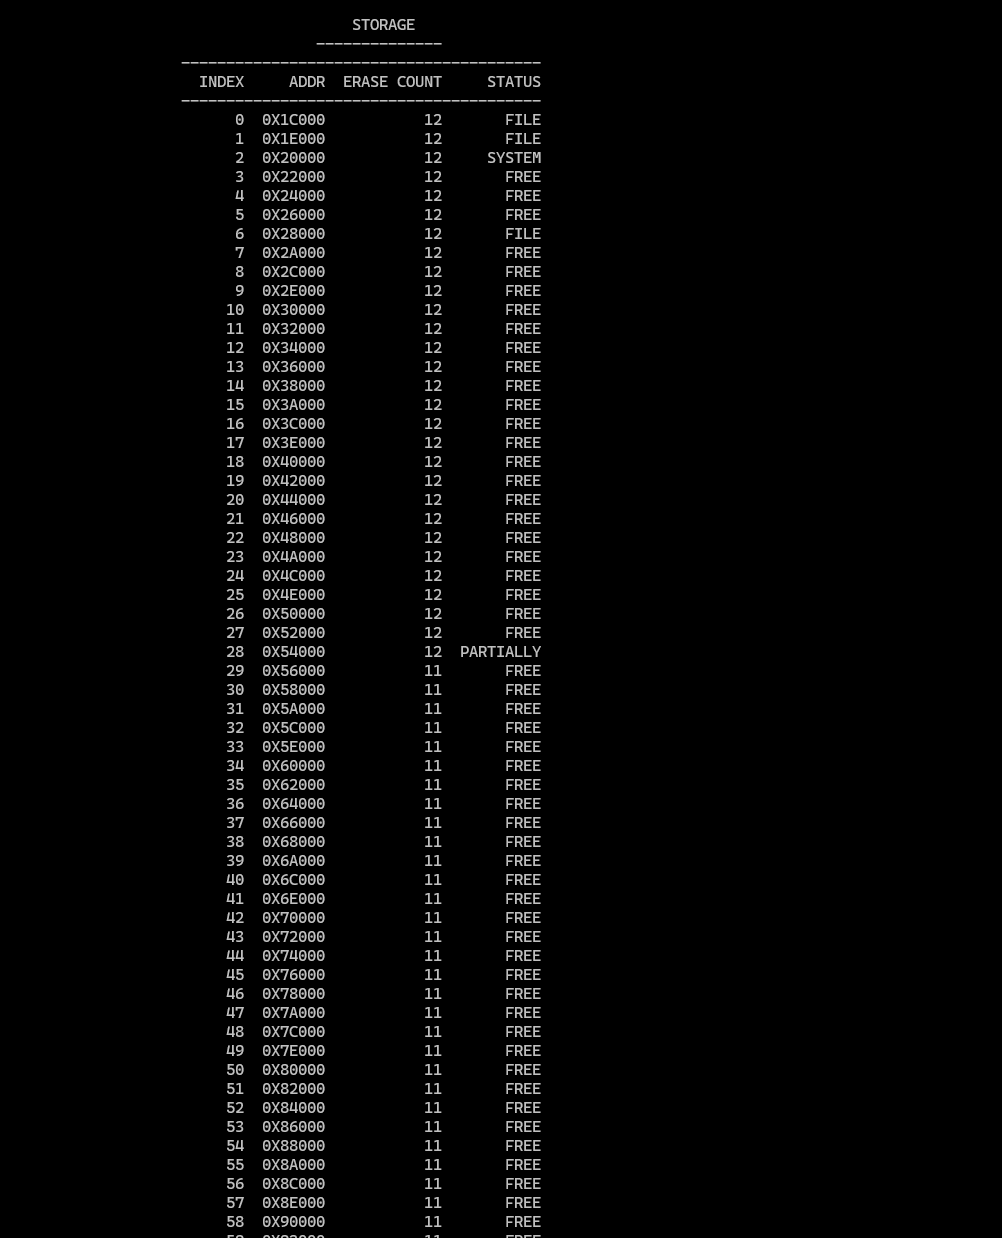
Storage Info
Displays service information about the state of the programmer file storage:zme_prog7 storageInfo -d --device [-b --baudrate]
Use cases
This programmer is a very powerful tool. Below you can find the typical use cases.
Example: Flash a binary file
When developing, one typically want to flash the Secure Engine firmware (should be done once), the bootloader and the firmware. Here is an example:
zme_prog7 flashFile s2c1_se_firmware.hex -d /dev/ttyUSB2
zme_prog7 flashFile <key> -d /dev/ttyUSB2
zme_prog7 flashFile bootloader.hex  -d /dev/ttyUSB2
zme_prog7 flashFile firmware.hex  -d /dev/ttyUSB2
Secure Engine bootloader is typically take from SiLabs git. If the connected device is based on a chip that does not have a Secure Engine, skip the step with loading Secure Engine firmware.
The bootloader and the firmware are compiled using the SiLabs Simplicity Studio.
Example: Load a licence from Z-Wave.Me
The license sets the number of allowed flash operations (flash counter). This ensures the factory can't produce more devices you ordered. Always have a 5-10% extra count for rework at the factory side.
Data in slots is encrypted and can not be extracted from the programmer. This ensures your intellectual property safety, keeping things simple for the factory.
zme_prog7 lic EB6BEEAC1A07D48BA24FF0AC6...C7 -d /dev/ttyUSB2
Example: Mass flash a product
For mass flashing of a product, load files in slots (from a .zip file or individually one by one). Then use a button or a command to flash the product.
Preparing the production from zip:
zme_prog7 slotStore firmware_pack.zip -d /dev/ttyUSB2
Preparing the production from zip:
zme_prog7 slotStore s2c1_se_firmware.pkzme -d /dev/ttyUSB2
zme_prog7 slotStore firmware.pkzme -d /dev/ttyUSB2
zme_prog7 slotStore bootloader.pkzme -d /dev/ttyUSB2
zme_prog7 slotStore key.pkzme -d /dev/ttyUSB2
Flahing (with user-data):
zme_prog7 flashProduct -u "014704010301ff00000001010F010E030Dffffffffffffffffffffffffffff19f0" -d /dev/ttyUSB3 -c EFR32ZG23B020F512IM48
Example radio tests
Production or FCC/CE certification tests examples:
Zigbee on 2405 MHz:zme_prog7 radioTest -m PN9 -c 11 -fr 2P4GHZ -p 200 -t 10000 -d COM5
Zigbee on 2440 MHz:zme_prog7 radioTest -m PN9 -c 18 -fr 2P4GHZ -p 200 -t 10000 -d COM5
Zigbee on 2480 MHz:zme_prog7 radioTest -m PN9 -c 26 -fr 2P4GHZ -p 200 -t 10000 -d COM5
BLE 2 Mbps on 2402 MHz:zme_prog7 radioTest -m PN9 -c 0 -fr BLE_2MBPS -p 200 -t 10000 -d COM5
BBLE 2 Mbps on 2440 MHz:zme_prog7 radioTest -m PN9 -c 19 -fr BLE_2MBPS -p 200 -t 10000 -d COM5
BLE 2 Mbps on 2480 MHz:zme_prog7 radioTest -m PN9 -c 39 -fr BLE_2MBPS -p 200 -t 10000 -d COM5
Technical specifications
| Voltage | 5 V USB-C |
| Max current | TBD |
| Operating temperature | 5°C … +50°C |
| Dimensions | 90 x 50 x 25 mm |
| Weight | 50 g |
| Communication interfaces |
USB (4 virtual serial ports) Z-Wave (wireless) Zigbee/Thread/802.15.4/BLE (wireless) SWD |
| Z-Wave frequency |
865...869 MHz: Europe (EU), India (IN), Russia (RU), China (CN), South Africa (EU), Middle East (EU) 908...920 MHz: America, excluding Brazil and Peru (US), Israel (IL) 919...921 MHz: Australia / New Zealand / Brazil / Peru (ANZ), Hong Kong (HK), Japan (JP), Taiwan (TW), Korea (KR) |
| Zigbee/Thread frequency | 2405...2480 MHz |
| BLE frequency | 2402...2480 MHz |
Troubleshooting
| Problem | Programming fails immediately of a while after starting |
| Cause | The programming cable is too long |
| Solution | Reduce the cable length or slow down the programming speed using Config speed |
| Problem | The software tool can't communicate with the programmer |
| Cause | Bad cable or wrong port selected |
| Solution | Check the USB cable. Use the 3rd port out of 4 ports (/dev/ttyUSB2 on Linux) |
| Problem | The clock is not correct in the programmer after power cycle |
| Cause | The battery is not installed in the programmer |
| Solution | Insert the coin-cell CR2032 battery |
| Problem | No RF emission in radio test mode |
| Cause | Wrong channel is selected |
| Solution | Make sure to select the correct Z-Wave, Zigbee or BLE channel |
| Problem | |
| Cause | |
| Solution | |
Requirements
Software requirements: TBD
Document revision
Date |
Author |
Changes |
|---|---|---|
2023.06.20 |
Poltorak Serguei |
Initial version |
Channels and modulation
802.15.4 PHY (Zigbee, Thread, Matter)
Zigbee channels are numbered from 11 to 26.
Modulation is OQPSK.
Channel bandwidth is 250 kbps.
| Channel | Frequency, MHz | Channel | Frequency, MHz |
| 11 | 2405 | 19 | 2445 |
| 12 | 2410 | 20 | 2450 |
| 13 | 2415 | 21 | 2455 |
| 14 | 2420 | 22 | 2460 |
| 15 | 2425 | 23 | 2465 |
| 16 | 2430 | 24 | 2470 |
| 17 | 2435 | 25 | 2475 |
| 18 | 2440 | 26 | 2480 |
Bluetooth Low Energy
Bluetooth Low Energy channels are numbered from 0 to 39. Channels 37, 38, and 39 are Advertising channels.
Modulation depends on the bandwidth:
- GFSK on 125 kbps and 500 kbps
- DQPSK on 2 Mbps
- 8-DPSK on 1 Mbps
The tool uses RF channels 0..39 that corresponds to frequencies 2402..2480 MHz. See the table below for the mapping between the RF channel and the BLE Data/Advertising channel index.
| RF Channel | BLE Channel | Frequency, MHz | RF Channel | BLE Channel | Frequency, MHz |
| 0 | 37 (advertising) | 2402 | 20 | 18 | 2442 |
| 1 | 0 | 2404 | 21 | 19 | 2444 |
| 2 | 1 | 2406 | 22 | 20 | 2446 |
| 3 | 2 | 2408 | 23 | 21 | 2448 |
| 4 | 3 | 2410 | 24 | 22 | 2450 |
| 5 | 4 | 2412 | 25 | 23 | 2452 |
| 6 | 5 | 2414 | 26 | 24 | 2454 |
| 7 | 6 | 2416 | 27 | 25 | 2456 |
| 8 | 7 | 2418 | 28 | 26 | 2458 |
| 9 | 8 | 2420 | 29 | 27 | 2460 |
| 10 | 9 | 2422 | 30 | 28 | 2462 |
| 11 | 10 | 2424 | 31 | 29 | 2464 |
| 12 | 38 (advertising) | 2426 | 32 | 30 | 2466 |
| 13 | 11 | 2428 | 33 | 31 | 2468 |
| 14 | 12 | 2430 | 34 | 32 | 2470 |
| 15 | 13 | 2432 | 35 | 33 | 2472 |
| 16 | 14 | 2434 | 36 | 34 | 2474 |
| 17 | 15 | 2436 | 37 | 35 | 2476 |
| 18 | 16 | 2438 | 38 | 36 | 2478 |
| 19 | 17 | 2440 | 39 | 39 (advertising) | 2480 |