|
In order to access the API one need to authenticate itself. Z-Way uses sessions to authenticate users. Z-Way session is called ZWAYSession.
If remote access is used, the find.z-wave.me service will issue an additional token called ZBW_SESSID.
Please read in 13.1.5 about the token lifetime, permanent tokens and token usage guide before selecting your preferred authentication method.
The first access should be made from the local network to set the initial administrator password. The administrator user is called admin. Access thru the remote access service (desribed in 13.1.3) is not available until the administrator password is set.
To be able to send API requests, you need to get the session token using GET request to the URL
/ZAutomation/api/v1/system/first-access
The session token is stored in the reply as:
Below is an example of the session token request with curl.
curl -X GET http://192.168.1.109:8083/ZAutomation/api/v1/system/first-access -D -
Example of a successful response:
[Successful response]
HTTP/1.1 200 OK
Server: Mongoose/6.4
Content-Type: application/json; charset=utf-8
X-API-VERSION: 2.0.1
ZWAYSession: 75817f4d-1ad2-a595-fb21-2bda3d053510
Set-Cookie: ZWAYSession=75817f4d-1ad2-a595-fb21-2bda3d053510; Path=/
Access-Control-Allow-Origin: *
Access-Control-Allow-Methods: GET, PUT, POST, DELETE, OPTIONS
Access-Control-Allow-Headers: Authorization, Accept-Ranges, Content-Encoding, Content-Length, Content-Range, Content-Type, ETag, X-API-VERSION, Date, Cache-Control, If-None-Match, Content-Language, Accept-Language, X-ZBW-SESSID, ZWAYSession
Access-Control-Expose-Headers: Authorization, Accept-Ranges, Content-Encoding, Content-Length, Content-Range, Content-Type, ETag, X-API-VERSION, Date, Cache-Control, If-None-Match, Content-Language, Accept-Language, X-ZBW-SESSID, ZWAYSession
Connection: keep-alive
Date: Wed, 02 Mar 2022 13:17:41 GMT
Content-Length: 667

{"data":{"defaultProfile":{"id":1,"role":1,"login":"admin","name":"Administrator","lang":"en","dashboard":[],"interval":2000,"devices":[],"rooms":[0],"expert_view":true,"hide_all_device_events":false,"hide_system_events":false,"hide_single_device_events":[],"email":"admin@mail.com","skin":"","night_mode":false,"beta":false,"uuid":"03b97bd3-964b-4cb4-884f-e83183e8071e","sid":"75817f4d-1ad2-a595-fb21-2bda3d053510","showWelcome":true},"firstaccess":true,"uuid":"42e955ed-c166-c19d-59c4-acf391cf9f0a","serial":"42e955ed-c166-c19d-59c4-acf391cf9f0a","mac":"b8:27:eb:f3:ed:9f","remote_id":177252,"ip_address":"192.168.1.109"},"code":200,"message":"200 OK","error":null}
The administrator password can be set by sending the new password in JSON format using PUT to the URL
/ZAutomation/api/v1/auth/update/1User credentials should look like (the email field is optional):
[Example of the JSON format for credential update]
{"id": 1, "password": "12345678", "passwordConfirm": "12345678", "email": "admin@mail.com"}
Below is an example of the administrator password setup:
curl -X PUT -H "ZWAYSession: 75817f4d-1ad2-a595-fb21-2bda3d053510" -H "Content-Type: application/json" -d '{"id":1,"password":"12345678","passwordConfirm":"12345678","email":"admin@mail.com"}' http://192.168.1.109:8083/ZAutomation/api/v1/auth/update/1 -D -
If used in local network, Z-Way can be directly addressed via
http://IP:8083
Note that if Z-Way is used in trusted network and only Z-Wave API is supposed to be used, you might consider to skip authentication and check option Public API access in Z-Wave Binding app.
Z-Way session can be obtained by sending login and password in JSON format using POST to URL
/ZAutomation/api/v1/loginUser credentials should look like {"login":"admin", "password":"admin"}.
It is also possible to use Basic Authentication to transmit login and password.
In return the session will be sent in three forms:
Example of successful login will look like:
[Successful login reply]
{
    "data": {
        "sid": "ba69cb5b-b2fd-5ce0-5b75-9bae3e8bc369",
        "id": 1,
        "role": 1,
        "name": "Administrator",
        "lang": "en",
        "color": "#dddddd",
        "dashboard": [],
        "interval": 2000,
        "rooms": [
            0
        ],
        "hide_all_device_events": false,
        "hide_system_events": false,
        "hide_single_device_events": []
    },
    "code": 200,
    "message": "200 OK",
    "error": null
}
[Wrong login/password reply]
{
    "data": null,
    "code": 401,
    "message": "401 Unauthorized",
    "error": "User login/password is wrong."
}
Once obtained, the session can be sent to the Z-Way server via the following ways:
Below are few examples of local authentication.
With cURL using Authentication Bearer token:
curl -H "Authorization: Bearer .../..." http://192.168.0.62:8083/ZAutomation/api/v1/...
With cURL using cookies:
curl -H "Accept: application/json" -H "Content-Type: application/json" -X POST -d '{"form": true, "login": "admin", "password": "admin"}' http://192.168.0.62:8083/ZAutomation/api/v1/login -c cookie.txt curl http://192.168.0.62:8083/ZAutomation/api/v1/... -b cookie.txt
With cURL using Basic Authentication:
curl -u admin:admin http://192.168.0.62:8083/ZAutomation/api/v1/...
With wget using Basic Authentication:
wget –auth-no-challenge –user=admin –password=pwd 192.168.0.62:8083/ZAutomation/api/v1/...
From the browser using jQuery and Basic Authentication:
[Login with jQuery]
jQuery('img').click(function() {
    jQuery.ajax({
        url: "http://192.168.0.62:8083/ZAutomation/api/v1/...",
        beforeSend: function (xhr) { xhr.setRequestHeader ("Authorization", "Basic " + btoa("admin" + ":" + "password")); }
    });
});
If not disabled by the user, Z-Way provides remote access service to the controller via
https://find.z-wave.meSee section 3.3 for more information on the Z-Way remote access service.
This service accepts Z-Way Platform ID , username and password, checks entered credentials agains your Z-Way and if accepted returns back two sessions ZWAYSession and ZBW_SESSID in two forms:
The session can be obtained by
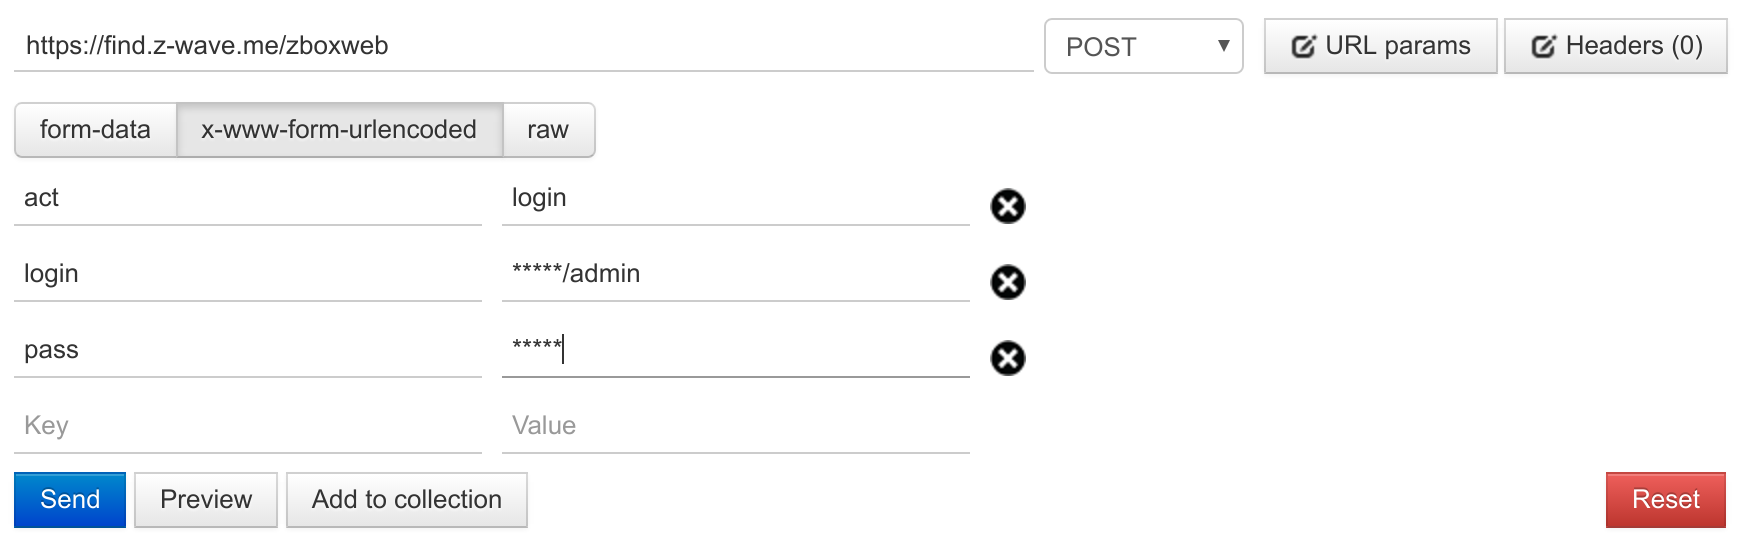
https://find.z-wave.me/zboxweb
https://find.z-wave.me/zboxwebwith form data act=auth&login=id/admin&pass=password
https://find.z-wave.me/zboxweb?act=auth&login=id/admin&pass=password
https://find.z-wave.me/zboxwebwith form data act=login&boxid=id&login=admin&pass=password
POST request with act=login will set cookies and redirect to the / of the Z-Way (in most cases it then redirects to /smarthome/). If you want the user to be redirected to some specific URL after log in add one more parameter ruri=... (see examples below).
GET and POST request with act=auth will return the token and set cookies accordingly. No redirect takes place in this case. This way is better for integrations thru the API.
The obtained session will be returned
The credential can be used in subsequent requests in one of the three forms listed below (in order they are checked in Z-Way):
Below are examples of remote authentication.
With cURL using Authentication Bearer token:
curl -H 'Authorization: Bearer .../...' https://find.z-wave.me/ZAutomation/api/v1/...
With cURL using cookies:
curl -H 'Accept: application/json' -X POST -d 'act=login&boxid=132339&login=admin&pass=admin1' https://find.z-wave.me/zboxweb -c cookie.txt curl https://find.z-wave.me/ZAutomation/api/v1/... -b cookie.txt
If you want the user to be redirected to a specific page after login, you can also use the following url:
https://find.z-wave.me/zboxweb?ruri=/expertor
https://find.z-wave.me/zboxweb?ruri=/expert&id=123456&login=adminto pre-fill Z-Way Platform ID and user name.
In some cases one might need to get a remote authentication token based on a local authentication token and remote ID. To do this make a request to
https://find.z-wave.me/zboxweb?act=session_login&zboxid=idwhere id is remote ID and the local token is passed via the Authorization Bearer header.
For example:
curl -H 'Authorization: Bearer /0fa324dc-b089-754e-8379-01fc8ec5a446' 'https://find.z-wave.me/zboxweb?act=session_login&zboxid=123456' -c cookie.txt
The tables below describe possible errors returned by the remote access service. Errors are order exactly as the request is handled.
Authentication on https://find.z-wave.me/zboxweb with act=login:
| Condition | HTTP code | Redirect URL |
| Box not connected to the server | 302 | https://find.z-wave.me/zboxweb?err=bad_login&ruri=/ |
| Box connected, but default login/password admin/admin is used | 302 | https://find.z-wave.me/zboxweb?err=insecure_login_pass&ruri=/ |
| Box not connected to find.z-wave.me | 502 | |
| Box connected, but login/password is invalid | 302 | https://find.z-wave.me/zboxweb?err=bad_login&ruri=/ |
| Box connected and authentication is successful | 302 | https://find.z-wave.me/ |
Authentication on https://find.z-wave.me/zboxweb with act=auth:
| Condition | HTTP code | HTTP error message |
| Box not connected to the server | 403 | Forbidden Wrong username or password |
| Box connected, but default login/password admin/admin is used | 403 | insecure_login_pass Your (username, pass) pair is insecure |
| Box not connected to find.z-wave.me | 502 | |
| Box connected, but login/password is invalid | 403 | Forbidden Wrong username or password |
| Box connected and authentication is successful | 200 |
Subsequent requests to https://find.z-wave.me/PATH, where PATH is not equal to zboxweb or zboxweb/*:
| Condition | HTTP code | Redirect URL |
| No token (no Authorization header, no X-ZBW-SESSID header, no ZBW_SESSID cookie) | 307 | https://find.z-wave.me/zboxweb/r//PATH |
| Invalid token (incorrect or expired or revoked) | 307 | https://find.z-wave.me/zboxweb/r//PATH |
| Box not connected to find.z-wave.me | 502 | |
| Server side error | 500 |
Each time you log in using methods described above a new session is created. This session will live for one week (might be changed on Z-Way side and on find.z-wave.me side, do not rely on this period).
Those login methods are good to obtain the token once to the access the API via token or for rare single actions. Creating a new session each time will pollute user profile in Z-Way.
Tokens can be deleted at any time in User management (4.3.1) panel. This will lead to log-out of the application that is using this token. This application will loose access to Z-Way and will require again a log in via username and password.
To use tokens long term we recommend to make them permanent. You can make any token permanent by pressing a button in User management (4.3.1). Permanent token do never expire until deleted. Only Z-Way token can be made permanent that way.
To make both find.z-wave.me and Z-Way token permanent use Authentication Bearer way to transmit tokens.
Both find.z-wave.me remote access service and Z-Way do support Authentication Bearer HTTP header. This header is commonly used in OAuth2 authentication protocol, but you can use it without OAuth2 too.
Z-Way and find.z-wave.me will automatically mark tokens as permanent if they are received in Authentication Bearer header.
The format of the header is: Authorization: Bearer ZBW_SESSID/ZWAYSession. Note that if direct access is needed (not via find.z-wave.me), ZBW_SESSID can be omitted. In this case a slash / should still preceed ZWAYSession
A typical application should take usename and password to log in via find.z-wave.me and get both ZWAYSession and ZBW_SESSID tokens to form Authentication Bearer token. The username and password should then be erased from the memory, while Authentication Bearer token should be saved for future use. It is not recommended to save user credentials.
Like other tokens user can delete the permanent token in the User management (4.3.1) panel.
Z-Way do also support OAuth2 authentication method to provide access to smart home devices to third party services like voice assistances (Amazon Alexa, Google Home, Yandex Alice), IFTTT and some others.
To get integrated one should provide to the Z-Wave.Me team redirect_uri and get back OAuth2 server URL, client_id and client_secret. Please contact info@z-wave.me.
To let the user authenticate and grant access to his devices you should redirect him to one of the two pages:
https://z-wave.me/oauth2/?state=...&redirect_uri=https://...&response_type=code&client_id=...
https://find.z-wave.me/zboxweb?lang=...&hide_diruris=1&ruri=/smarthome/%23/oauth2%3Fstate%3D...%26redirect_uri%3Dhttps%3A%2F%2F...%26response_type%3Dcode%26client_id%3D...
In this request:
/smarthome/#/oauth2?state=...&redirect_uri=https://...&response_type=code&client_id=...
After the user logs in to Z-Way he is asked to mark rooms and devices to be granted access to. A new user will then be created with the corresponding permissions and a session token will be generated. The session is saved on the Z-Wave.Me OAuth2 server together with an authorization code.
On the next step the user is redirected back to the service using URL
redirect_uri?state=...&code=...In this request:
The service can now make a POST request to the Z-Wave.Me OAuth2 server on
/tokenproviding client_id, client_secret and code. The request can use JSON format or form data or url encoded form. The response is a JSON with access_token or error message.
The resulting access_token is to be used in the Authentication Bearer HTTP header. This token never expires unless deleted by the user.
[Request of Access token via Authorization code (JSON format)]
Content-type: application/json
{
    "client_id": "...",
    "client_secret": "...",
    "code": "..."
}
[Request of Access token via Authorization code (URL encoded form)]
Content-Type: application/x-www-form-urlencoded
client_id=...&client_secret=...&code=... (URL encoded!)
[Request of Access token via Authorization code (form data)]
Content-Type: multipart/form-data; boundary=----WebKitFormBoundarytufRVLxOz9VdsQbA

------WebKitFormBoundarytufRVLxOz9VdsQbA
Content-Disposition: form-data; name="client_id"

...
------WebKitFormBoundarytufRVLxOz9VdsQbA
Content-Disposition: form-data; name="client_secret"

...
------WebKitFormBoundarytufRVLxOz9VdsQbA
Content-Disposition: form-data; name="code"

...
------WebKitFormBoundarytufRVLxOz9VdsQbA--
[Access token successfuly retrieved]
{
    "access_token": ".../...",
    "token_type": "bearer"
}
[Authorization code is invalid (400 Bad request)]
{
    "error": "invalid_grant"
}
[Wrong credentials (400 Bad request)]
{
    "error": "invalid_client"
}
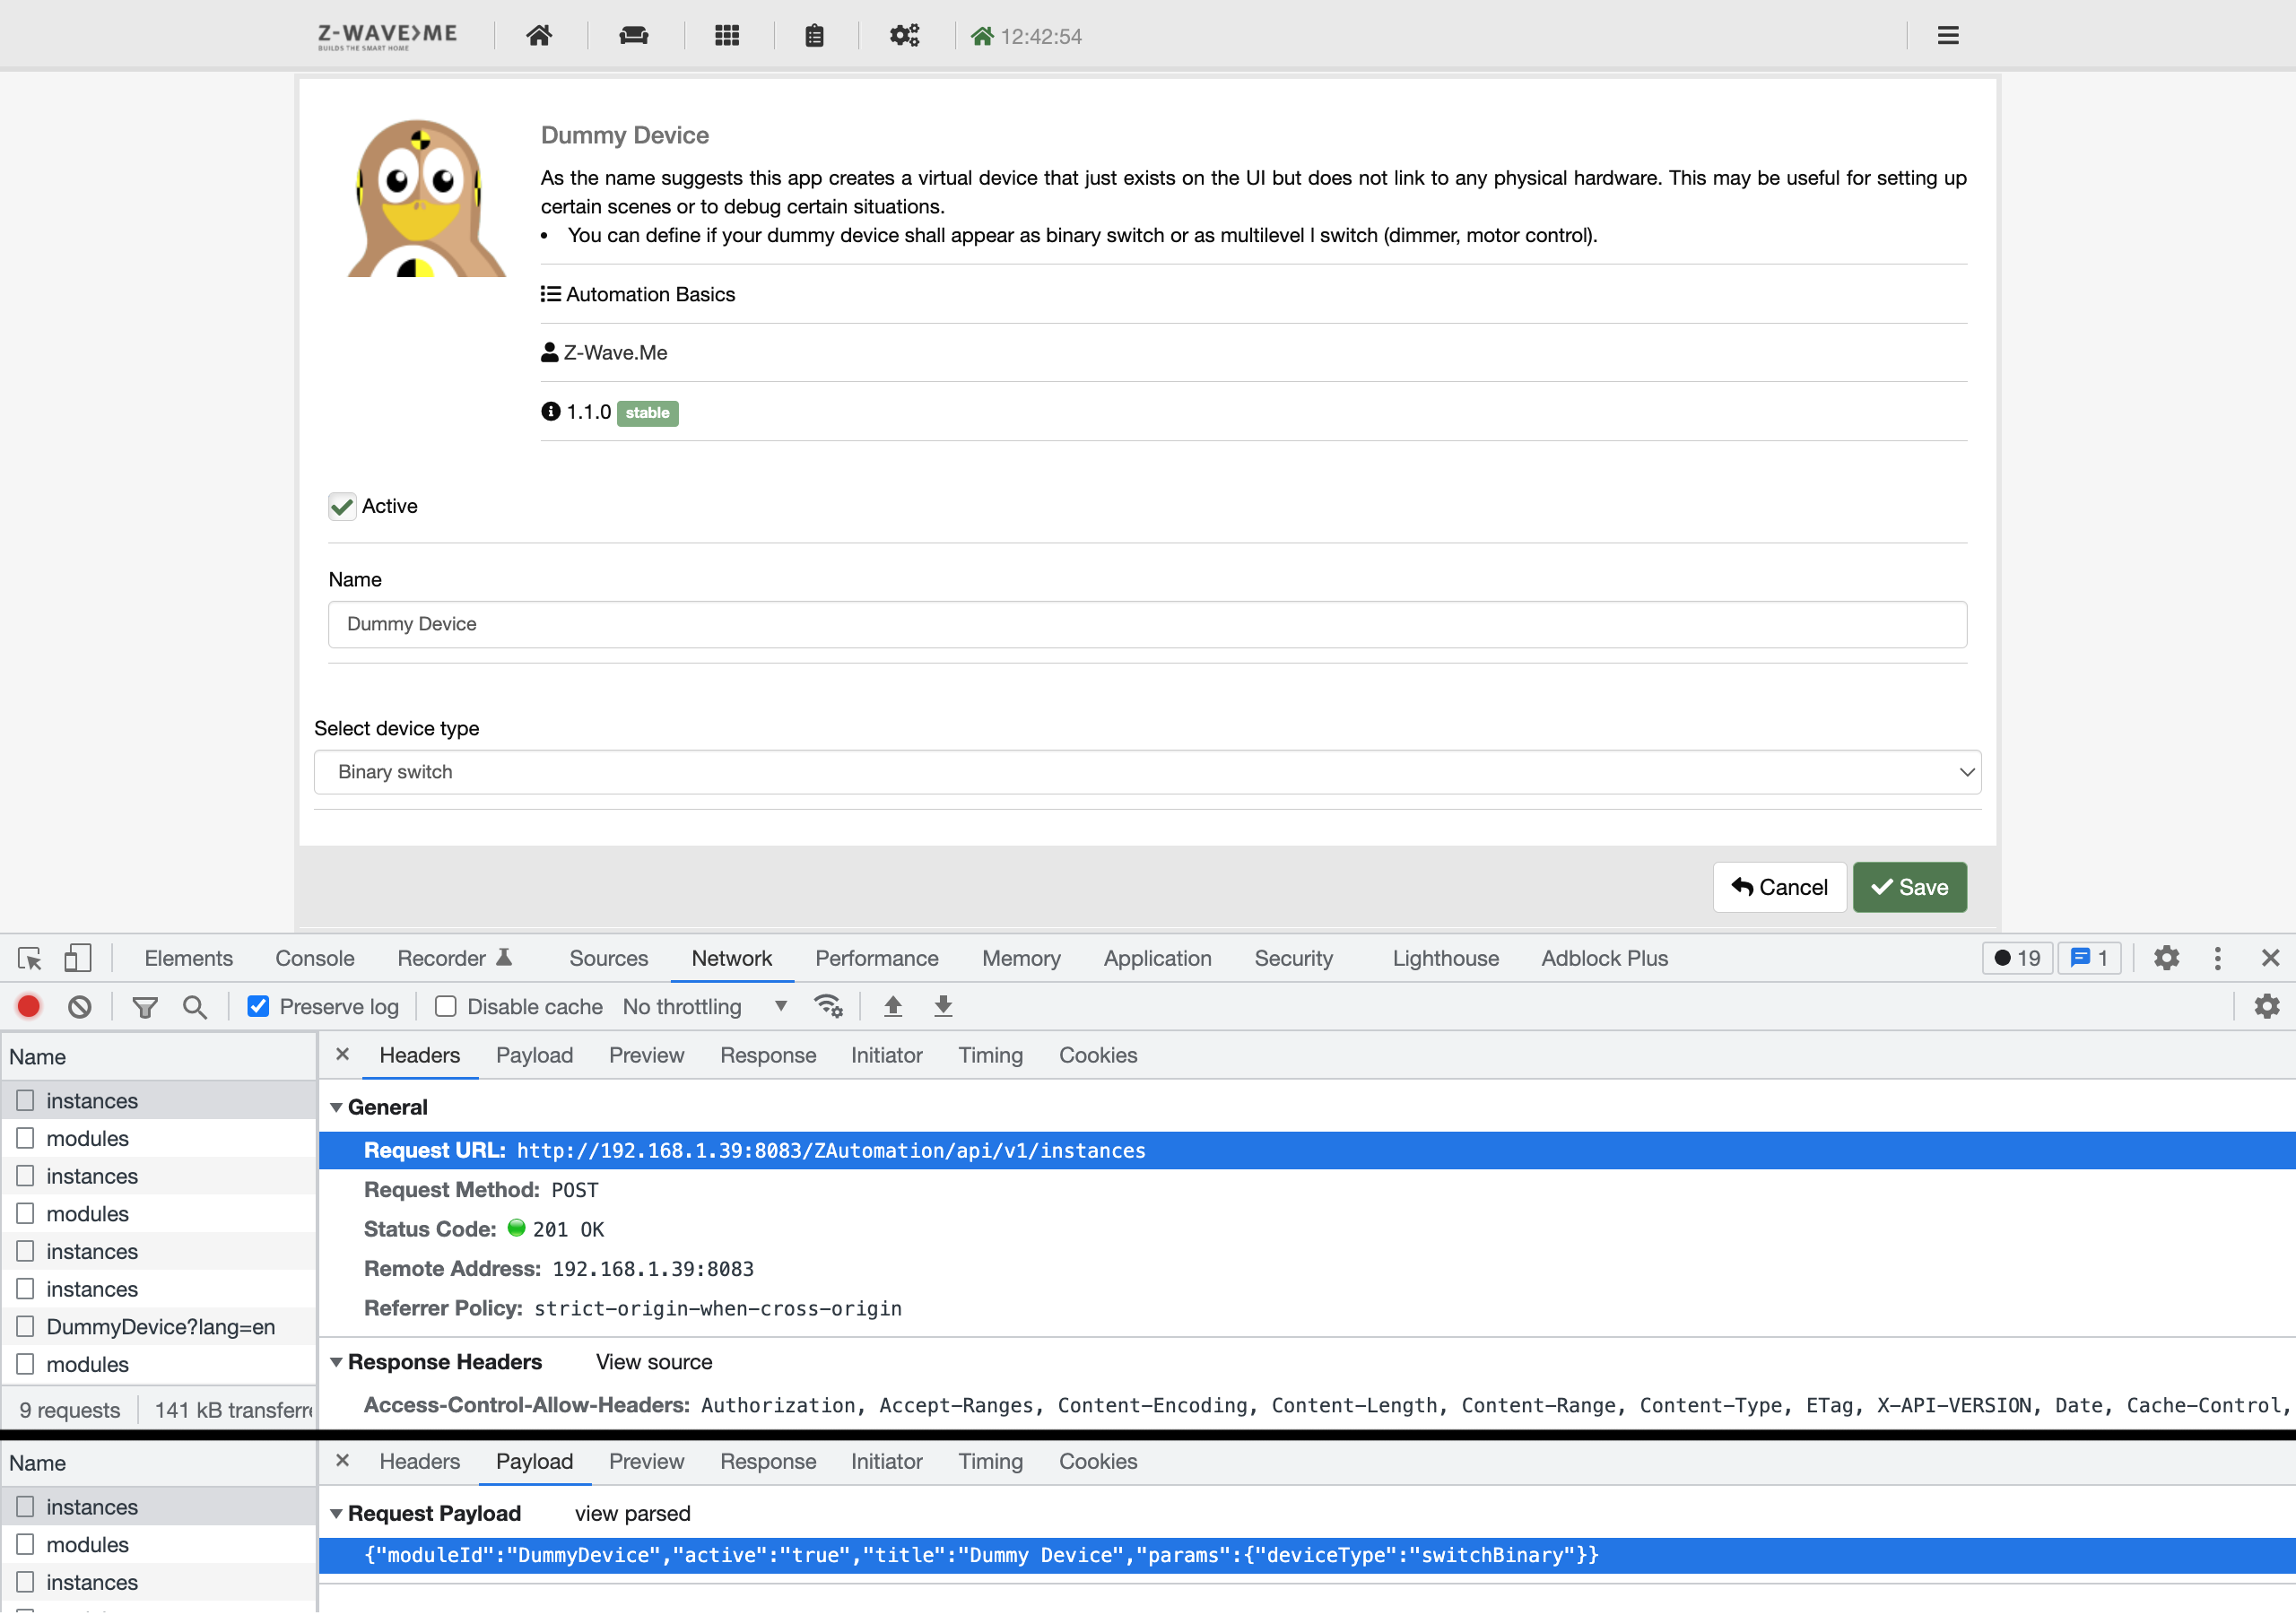
Using the Javascript API, you can create an instance of any App. When creating an App instance, you need to pass it's settings in JSON format. To find out the settings scheme, you can look into the browser developer tools log. As an example, let's look at how a Dummy Device App instance is created in browser.
In the network log you should see a POST request to:
http://192.168.1.39:8083/ZAutomation/api/v1/instanceswith data:
{"moduleId": "DummyDevice", "active": "true", "title": "Dummy Device", "params": {"deviceType": "switchBinary"}}
The curl example looks like this:
curl -X POST http://192.168.1.39:8083/ZAutomation/api/v1/instances -H "ZWAYSession: e452740f-3988-a20b-4bd6-cd98e1697247" -H 'Content-Type: application/json' -d '"moduleId":"DummyDevice","active":"true","title":"Dummy Device","params":"deviceType":"switchBinary"'
Response with a new instance of the module DummyDevice ID 28:
\{
  "data": {
    "module": "DummyDevice",
    "id": 28,
    "config": {
      "deviceType": "switchBinary"
    }
  },
  "code": 201,
  "message": "201 Created",
  "error": null
}
There is a community supported contribution: https://flows.nodered.org/node/node-red-contrib-zway
To set up the integration enter the URL to Z-Way (e.g ws://192.168.0.200:8083 for local access or wss://find.z-wave.me for remote access). For the token enter the API token taken from user settings page on the bottom.
Check https://github.com/Z-Wave-Me/node-red-contrib-zway for more info.
To set up the integration enter the URL to Z-Way (e.g ws://192.168.0.200:8083 for local access or wss://find.z-wave.me for remote access). For the token enter the API token taken from user settings page on the bottom.
Check https://github.com/Z-Wave-Me/ha-core for more info.
According to Chapter 12.5 apps have two core files:
The following chapter explains these two files more in detail.
Module.js defines the general behavior of the app and the interface to the user side. Table 13.1 shows the structure of the file module.js with an explanation of each line item.
The schema is a JSON Structure to define the user interface of the module. It lists all input parameters and options to be shown in the setup dialog of the app:
[Schema Structure]
{
  "schema": {
    "type": "object",
    "properties": {
    }
  }
}
The structure of the schema is the following. Inside the 'properties' space the single 'properties' can be defined. They become the parameter of the module during the initiation and they are shown as configuration parameters in the setup dialog. There are different types of input parameters:
[Schema Structure Simple Type]
{
  //Parametername
  "name": {
    "type": "array",
    "items": {
      "title": "Device",
      "type": "radio",
      //array of choosable items
      "enum": ["Adult", "Child"],
      "default": "Child",
      "required": true
    }
  },
  //Parametername
  "name": {
    "type": "integer",
    "required": true
  },
}
[Schema Structure Enumerations with a choice]
{
  //Parametername
  "name": {
    "field": "enum",
    "datasource": "namespaces",
    //special namespacedestination
    "enum": "namespaces:devices\_all:deviceId",
    "required": true
  },
}
Name spaces refer to the internal Z-Way structure. It allows to list elements from the Z-Way data model and filter it. The statement "namespaces:devices_all:deviceId" will offer a selection of all devices.
Namespaces can also be combined like
namespaces:devices_doorlock:deviceId,namespaces:devices_switchBinary:deviceId
which means devices doorlock and all binary switches. Namespaces can also be REST paths like
server:port/v1/namespaces/devices_DEVICETYPE.PATH
Thew file index.js contains the application as such. It can include other js files is needed but Z-Way will always look for a index.js file to load first. Table 13.2 list the basic structure of index.js with the minimum functions.
|
More information e.g. about the list of probe types etc. you find on
http://docs.zwayhomeautomation.apiary.io/
This part of the manual is not yet published because the service for creating own Device Description Files is not yet available.
How to include a new EnOcean Device (example Hoppe Door handle)
(1) Check if the profile is in /opt/z-way-server/config/Profile.xml. Not that you just need to know the profile the given product supports. There is no way to find out automatically!
[EnOcean Profile Entry]
<Profile rorg="0xf6" func="0x10" type="0x00" rorgDescription="RPS Telegram"
    funcDescription="Mechanical Handle" typeDescription="Window Handle">
  <Field offset="0" size="4" name="windowHandle" type="int" description="Movement of the window handle" short="WIN" />
</Profile>
(2) Add the device record of the device to
/opt/z-wave-server/htdocs/smarthome/storage/data/devices_encoean.json. Here the rorg, funcid and type are set. Now the device record will be created and the right values are changed on message reception. Now you need to make sure the right element is rendered and updated. This is in /opt/z-wave-server/automation/modules/Enocean/index.js
First add a filter to catch the events and call the correct function:
[Catch Device IDs]
if (matchDevice(0xf6, 0x10, 0x01)) {
  // Hoppe Window handle
  windowHandle("contact", "window", "Windor Handle");
}
now you add the function that handles the value changes and renders the element
accordingly. For the window handle we use the binary sensor element but overwrite
the status information according to the information of the window handle moves.
[Handle Device]
function windowHandle(dh, type, title) {
	var vDev = self.controller.devices.create({
	deviceId: vDevIdPrefix + type,
	defaults: {
		deviceType: 'sensorBinary',
		metrics: {
			probeTitle: type,
			scaleTitle: ”,
			icon: type,
			level: ”,
			title: title
		}
	},
	overlay: {},
	handler: function(command) {},
	moduleId: self.id
});

if (vDev) {
	self.dataBind(self.gateDataBinding, self.zeno, nodeId, dh,
	function(type) {
		try {
			if (this. handleValue == 13)
				vDev.set("metrics:level", "tilt");
			if (this. handleValue == 15)
				vDev.set("metrics:level", "closed");
			if (this. handleValue == 12 || this. handleValue == 14)
				vDev.set("metrics:level", "open");
		} catch (e) {}
	}, "value");
}
}