 |
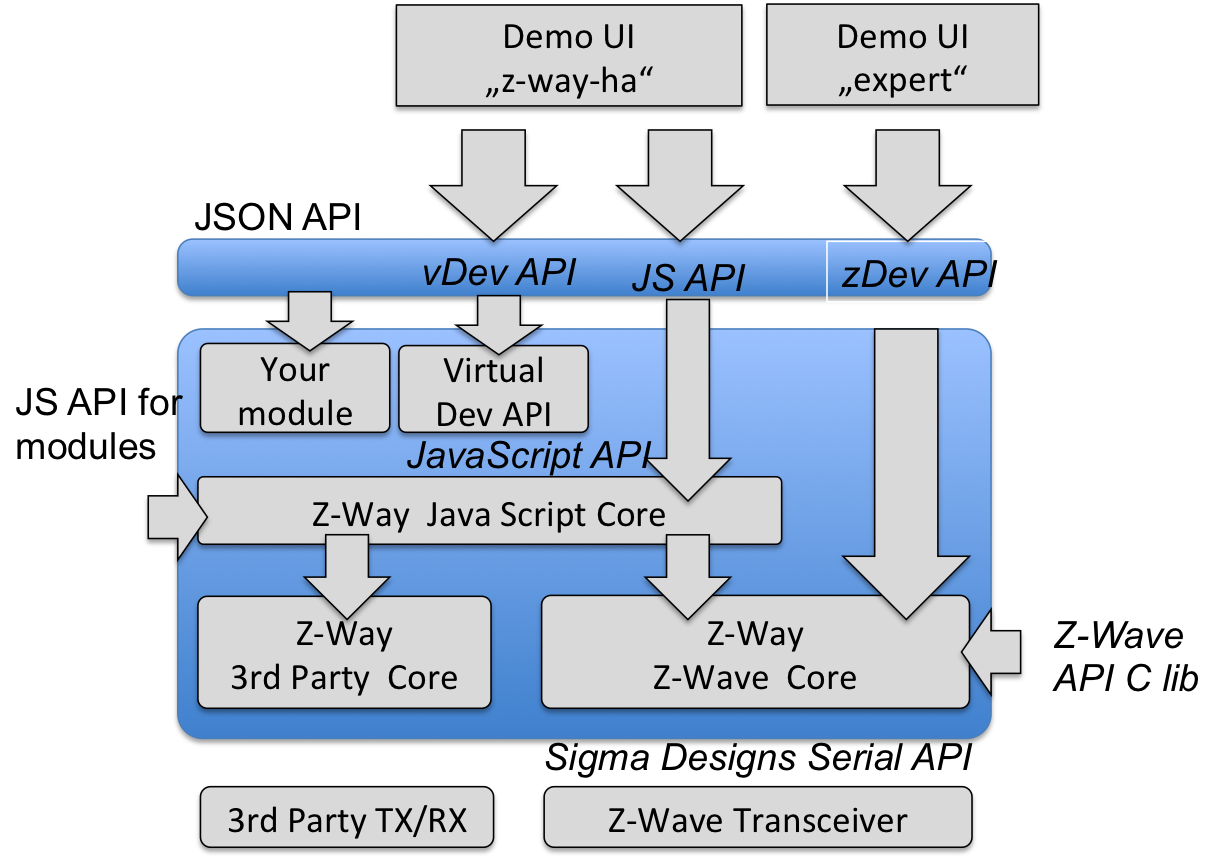
Z-Way offers multiple Application Program Interfaces (API) that are partly built on each
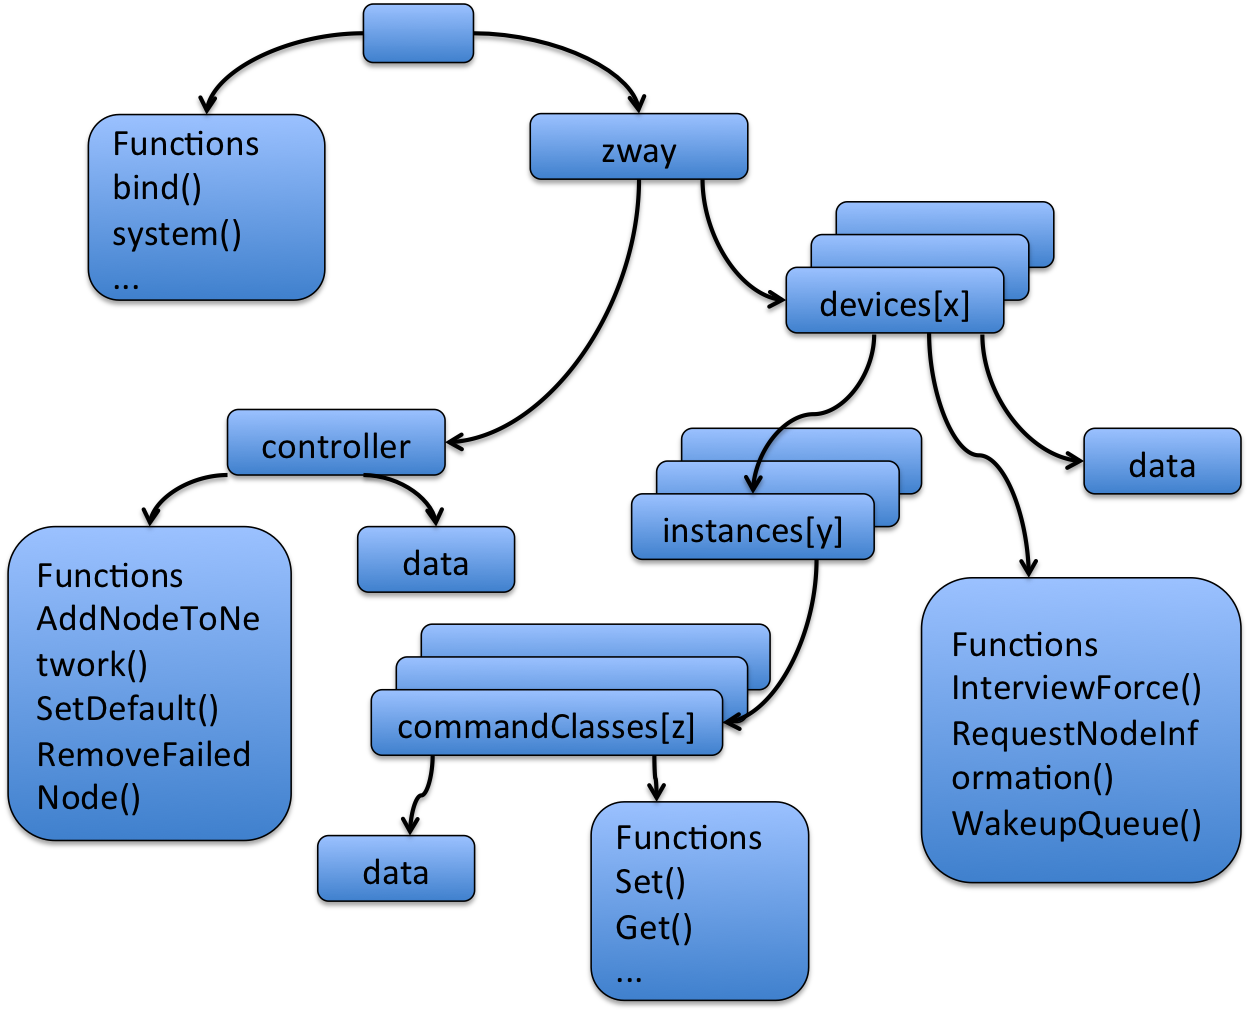
other. Figure 11.1 shows the general structure of Z-Way with focus on the APIs. The
most important part of Z-Way is the Z-Wave core. The Z-Wave core uses the standard Silicon
Labs Serial API to communicate with a Z-Wave compatible transceiver hardware but enhanced
with some Z-Way specific functions such as frequency change. The standard interface is
not public but available for owners of the Silicon Labs Development Kit (SDK)
![[*]](footnote.png)
The Z-Wave core services can be accessed directly using the Z-Wave Device API (zDev API). There are two Z-Wave device API versions available:
https://storage.z-wave.me/z-way-server/z-way-test.tgz
provides a sample application written in standard C that makes use of the C level API to demonstrate its application. Makefiles and project files for compilation on Linux and OSX are provided together with the sample code. More information on the C level API you find in Section 11.4.
The Z-Wave device API only allows the management of the Z-Wave network and the control and management of the devices as such. No higher order logic except the so-called Z-Wave associations between two Z-Wave devices can be used.
For all automation and higher order logic a JavaScript automation engine is available. This engine is also shipped with Z-Way.
The JavaScript API on top of the JS engine mirrors all functions of the Z-Wave Device API but also allows access to third-party device APIs (e.g. EnOcean). This means the JS API is the common ground for all further application logic and user interfaces (with the exception of the Z-WAVE EXPERT USER INTERFACE that uses the Z-Wave Device API.
The JavaScript layer makes use of a JavaScript implementation provided by Google it is also used in Googles Chrome web browser. All JavaScript API functions can also be accessed using the embedded webserver. The beauty of this interface is that JavaScript can be executed on the server and on the client. Executing on the client makes sense for small changes to the data model or running small helper programs.
There are two important sub-portions of the JavaScript layer:
The Z-Wave Device API implements the direct access to the Z-Wave network. All Z-Wave devices are referred to by their unique identification in the wireless network—the Node ID. Z-Wave devices may have different instances of the same function, also called channels (for example sockets in a power strip). The Z-Wave Device API refers to them as daughter objects of the physical device object identified by an instance ID. In case there is only one instance, the instance ID = 0 is used.
All device variables and available commands in a Z-Wave device are grouped in the so-called
command classes. The Z-Wave API allows direct access to all parameters, values and commands
of these command class structures. Annex ![[*]](crossref.png) gives you the complete reference of
the implemented command classes.
gives you the complete reference of
the implemented command classes.
Beside the devices the Z-Wave Device API also offers access to the management interface of
the network. Annex gives you a full reference of the implemented
function classes.
The Z-Wave Device API can be accessed on the JSON API with any standard web browser using the URL
http://YOURIP:8083/ ZWaveAPI/*.
Device objects or commands of these objects are accessed by
http://YOURIP:8083/ ZWaveAPI/Run/devices[*].*
http://YOURIP:8083/ ZWaveAPI/Run/devices[x].instances[y].*
http://YOURIP:8083/ ZWaveAPI/Run/devices[x].instances[y].commandClasses[z].*
The whole data tree of the Z-Wave network is accessed using
http://YOURIP:8083/ZWaveAPI/Data/*.
Please refer to the Z-Way for information about the context, the commands, and the data used. Section 11.3 provides more information about the API and the underlying data structure.
All acces ot the webserver require authentication of the user. Please refer to Chapter 13.1 for details how to authenticate.
The Z-Wave Device API or any other third-party technology API do not offer any higher order logic support but the pure access to functions and parameters of devices only.
Z-Way offers an automation engine to overcome this restriction. A server-side JavaScript runtime environment allows writing JavaScript modules that are executed within Z-Way (means on the server). The same time all functions of the JS API can also be accessed on the client side (the web browser). This offers some cool debug and test capabilities. Among others it is possible to write whole JS functions right into the URL or the browser.
The JS API can be accessed from the web browser with the URL
http://YOURIP:8083/JS/Run/*
Among others the whole Z-Wave Device API is available within the JS API using the object “zway’‘. As a result, the following three statements refer to the very same function:
Due to the scripting nature of JavaScript it is possible to “inject’‘ code at run time using the interface. Here a nice example how to use the JavaScript setInterval function:
[Polling of device \#2]
/JS/Run/setInterval(function() {
    zway.devices[2].Basic.Get();
}, 300*1000);
This code will, once “executed’‘ as URL within a web browser, call the Get() command of the command class Basic of Node ID 2 every 300 seconds.
A very powerful function of the JS API is the ability to bind functions to certain values of the device tree. They get then executed when the value changes. Here is an example for this binding. The device No. 3 has a command class SensorMultilevel that offers the variable “level.’’ The following call—both available on the client side and on the server side—will bind a simple alert function to the change of the variable.
[Bind a function]
zway.devices[3].SensorMultilevel.data[1].val.bind(
	function() {
	debugPrint('CHANGED TO:' + this.value + '\n');
});
Chapter 11.3 and 11.3.1 describe the whole JS API in detail. The
names and IDs of the different command classes as well as their instance variables
can be found in the Annex .
JavaScript modules can and will generate new functions that are accessible using the JSON interface. For simplification function calls on the API (means on the client side) are written in URL style starting with the word “ZAutomation’’:
All functions and instances of a physical device, which are represented as daughter objects in the Z-Wave Device API, are enrolled into individual virtual devices.
In case the Z-Wave API shows one single physical device with two channels, the Virtual Device API will show two devices with similar functionality. In case the Z-Wave API shows a physical device with several functions (like a binary switch and an analog sensor in one device), the Virtual Device API (vDev API) will show them as several devices with one function each.
The vDev is accessed using the JSON API in a slightly different style than zDev API. All devices, variables, and commands are encoded into a URL style for easier handling in AJAX code. A typical client-side command in the vDev API looks like
http://YOURIP:8083/ZAutomation/api/v1/devices/ZWayVDev_6:0:37/command/off
“API’’ points to the vDev API function, “v1’’ is just a constant to allow future extensions. The devices are referred to by a name that is automatically generated from the Z-Wave Device API. The vDev also unifies the commands “command’’ and the parameters, here “off.’’
On the server side, the very same command would be encoded in a JavaScript style.
[Bind a function]
dev = this.controller.devices.get('ZWayVDev\_6:0:37');
dev.command('off');
The vDev API also offers support for notifications, locations information, the use of other modules, etc.
Table 11.1 summarizes the functions of the different APIs.
This chapter describes the Z-Wave Device API and its use in detail All examples will use the HTTP/JSON API notation. Please note that the C library notation offers equal functionality.
The Z-Wave Device API is the north-bound interface of the Z-Wave Core. This Z-Wave core implement the whole control logic of the Z-Wave network. The two main functions are
The description of function classes and command Cclasses and their access using the JSON
API complete the description of the Z-Wave Device API. For a full reference of function
classes and command classes please refer to the Annex and .
Z-Way holds all data of the Z-Way network in a data holder structure. The data holder structure is a hierarchical tree of data elements.
Following the object-oriented software paradigm the different commands targeting the network or individual devices are also embedded into the data objects as object methods.
Each data element is handled in a data object that contains the data element and some contextual data.
Each Data element such as devices[nodeID].data.nodeId is an object with the following child elements:
Every time a command is issued that will have impact on a certain data holder value the time of the request is stored in "invalidateTime". This allows tracking when a new data value is requested from the network and when this new data value is provided by the network.
This is particularly true if Z-Way is sending a SET command. In this case the data value is invalidated with the "SET" commands and gets validated back when the result of the GET command was finally stored in the data model.
To maintain compatibility with JavaScript the data object has the following methods implemented:
These aliases are not enumerated if the dataholder is requested (data.level returns value: 255, name: "level", updatedTime: 12345678, invalidatedTime: 12345678).
The root of the data tree has two important child objects:
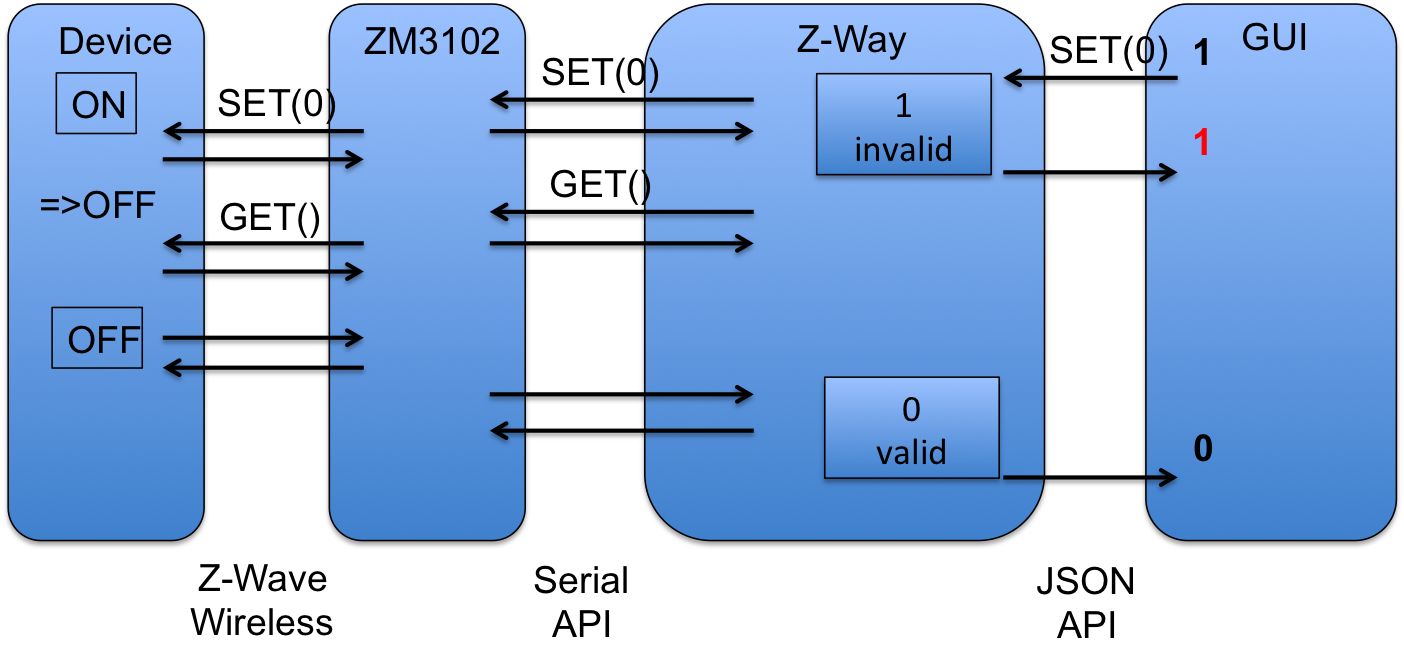
Please note that all status variables accessible on the Z-Wave Device APIs are only proxy of the real value in the network.
To transport data between the real wireless device and the GUI multiple communication instances are involved. The complexity of this communication chain will be explained in the following example:
Assuming the GUI shows the status of a remote switch and allows changing the switching state of this device. When the user hits the switching button, he expects to see the result of his action as a changing status of the device in the GUI. The first step is to hand over the command (SET) from the GUI to Z-Way using the JSON interface. Z-Way receives the command and will confirm the reception to the GUI. Z-Way recognizes that the execution of the switching command will likely result in a change of the status variable However Z-Way will not immediately change the status variable but invalidate the actual value (mark as outdated). This is the correct action because at the moment when the command was received the status on the remote device has not been changed yet but the status of the switch is now unknown. If the GUI polls the value it will still see the old value but marked as invalid. Z-Way will now hand over the switching command to the Z-Wave transceiver chip. Since it is possible that there are other command waiting for execution (sending) by the Z-Wave transceiver chip the job queue is queuing them and will handle certain priorities if needed. Z-Way has recognized that the command will likely change the status of the remote device and is therefore adding another command to call the actual status after the switching command was issued. The transceiver is confirming the reception of the command and this confirmation is noted in the job queue. This confirmation however only means that the transceiver (Z-Wave chip) has accepted the command and does neither indicate that the remote device has receives it nor even confirming that the remote device has executed accordingly. The transceiver will now try to send the command wirelessly to the remote device. A successful confirmation of the reception from the remote device is the only valid indicator that the remote device has received the command (again, not that it was executed!). The second command (GET) is now transmitted the very same way and confirmed by the remote device. This device will now sent a REPORT command back to Z-Way reporting the new status of the switching device. Now the transceiver has to confirm the reception. The transceiver will then send the new value to the Z-Way engine by issuing commands via the serial interface. Z-Way receives the report and will update the switching state and validate the value. From now on the GUI will receive a new state when polling.
JSON API allows executing commands on the server side using HTTP POST or GET requests. The command to execute is taken from the URL.
All functions are executed in form
http://YOURIP:8083/Run/ZWaveAPI*.
The best way to learn about the commands and the data is to use the Z-WAVE EXPERT USER INTERFACE plus a JavaScript Debugger to see the command the AJAX code of the Z-WAVE EXPERT USER INTERFACE sends to the Z-Way server backend. Additionally the Z-Wave Expert User Interface provides nice and convenient vizualization of all commends (both command classes and function classes).
All access to the webserver require authentication of the user. Please refer to Chapter 13.1 for details how to authenticate.
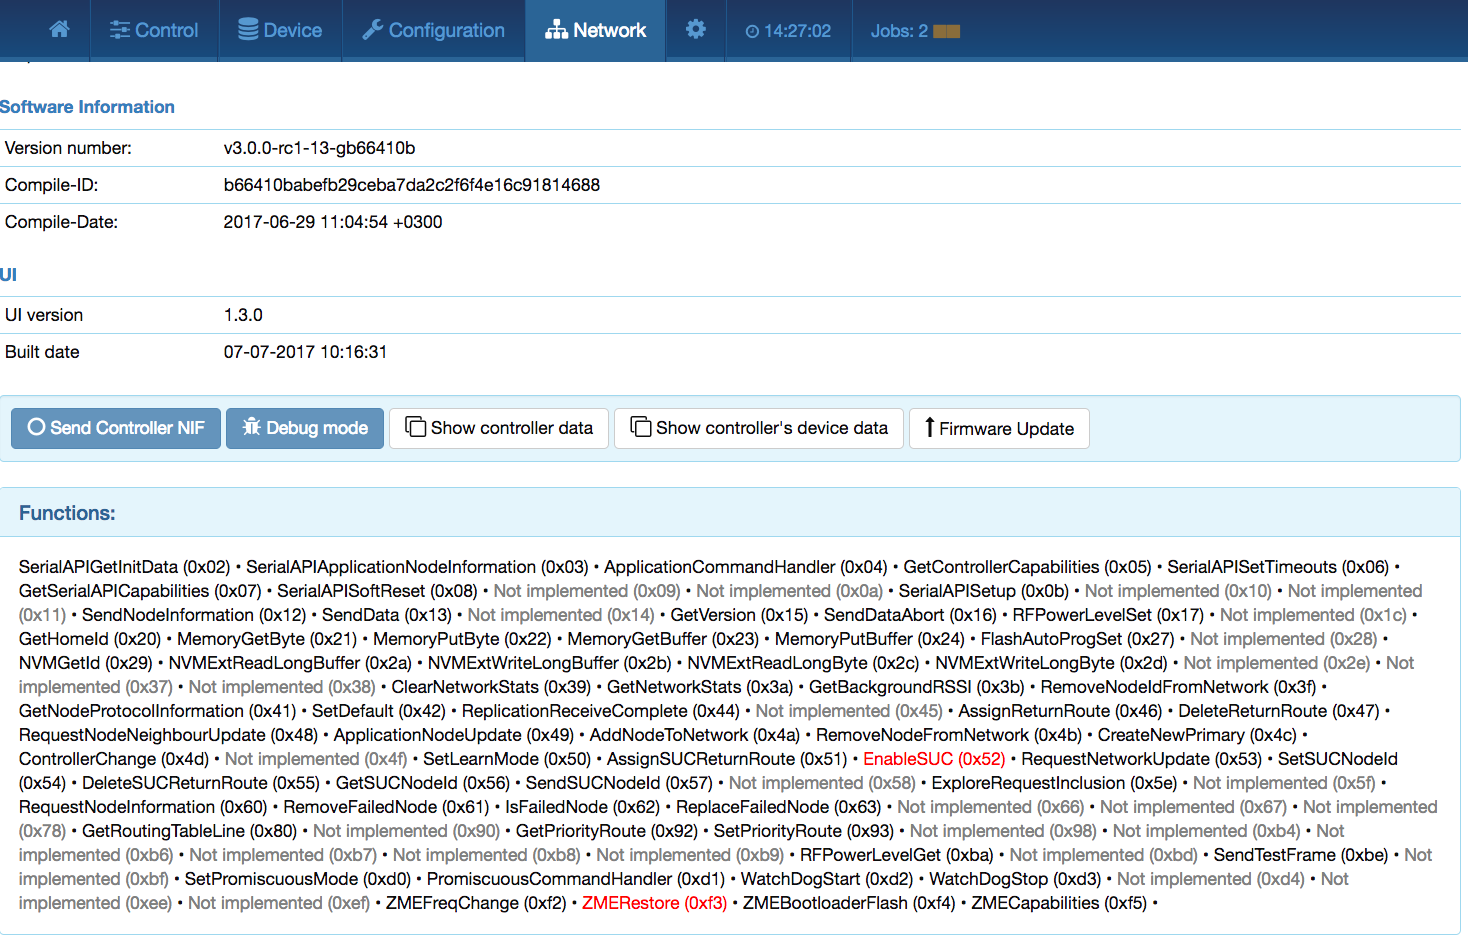
Figure 11.4 shows the Controller Info Page in Network menu with a list of all
function classes implemented. The complete reference of the parameters and return
values of the functions classes you find in annex .
Assuming there is a function class “SerialAPIGetInitData’’ it is possible to call the function by calling the URL
/ZWaveAPI/Run/SerialAPIGetInitData(0)
in the web browser. In case the function was completed successfully, a simple “null’’ is returned; otherwise, an error code is provided.
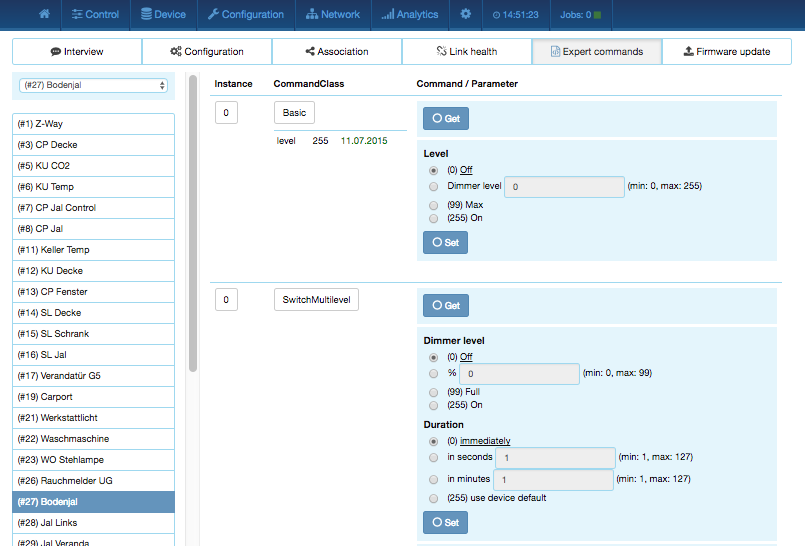
In the same manner, it is possible to send a command to a device using one of its command
classes. The Z-WAVE EXPERT USER INTERFACE provides a general menu item called Expert Commands as
shown in Figure 11.5. Z-Way reads out all command classes and its functions and
provides here a complete list of command lass-specific commands. The debug window will
reveal the syntax if the complete command class reference in Annex is not
available or too inconvenient to use.
For example, to switch ON a device no 2 using the command class BASIC, it is possible to write:
/ZWaveAPI/Run/devices[2].instances[0].commandClasses[0x20].Set(255)or
/ZWaveAPI/Run/devices[2].instances[0].Basic.Set(255)
The Z-WAVE EXPERT USER INTERFACE has a JavaScript command
runCmd(<command>)to simplify such operations. This function is accessible in the JavaScript console of your web browser (in Chrome you find the JavaScript console under View->Debug->JS Console). Using this feature, the command in JS console would look like
runCmd('devices[2].instances[0].Basic.Set(255)')
The usual way to access a command class is using the format
'devices[nodeId].instances[instanceId].
commandClasses[commandclassId]'.
There are ways to simplify the syntax:
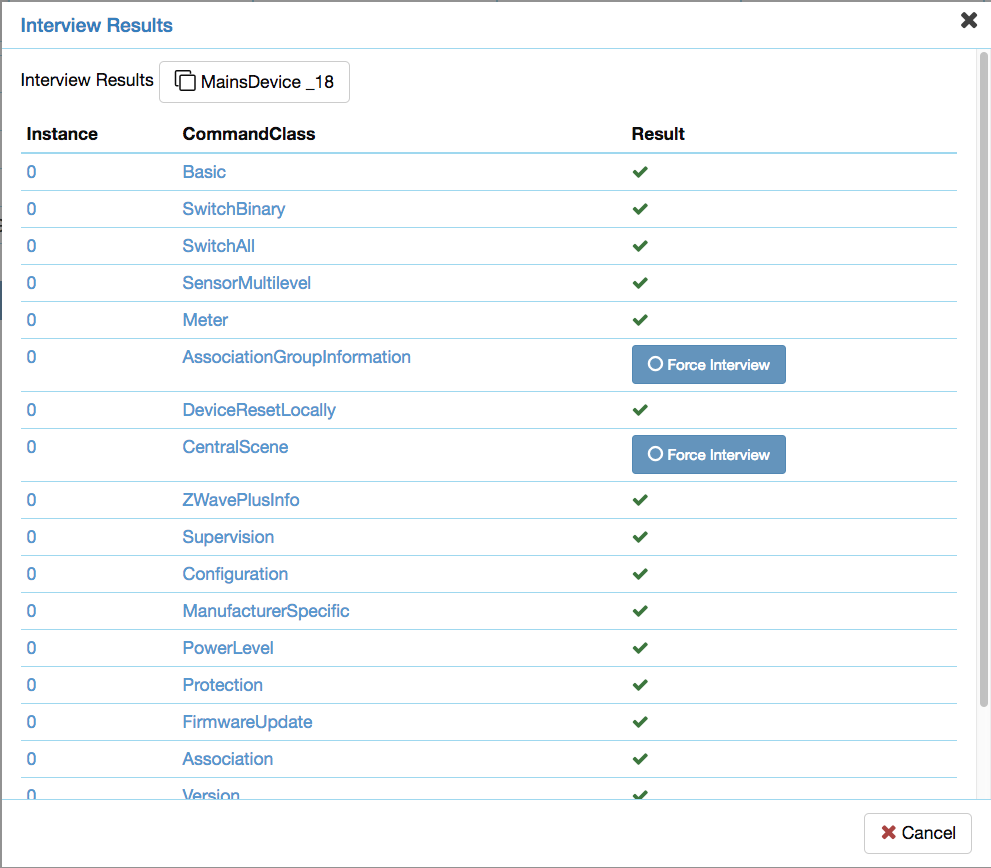
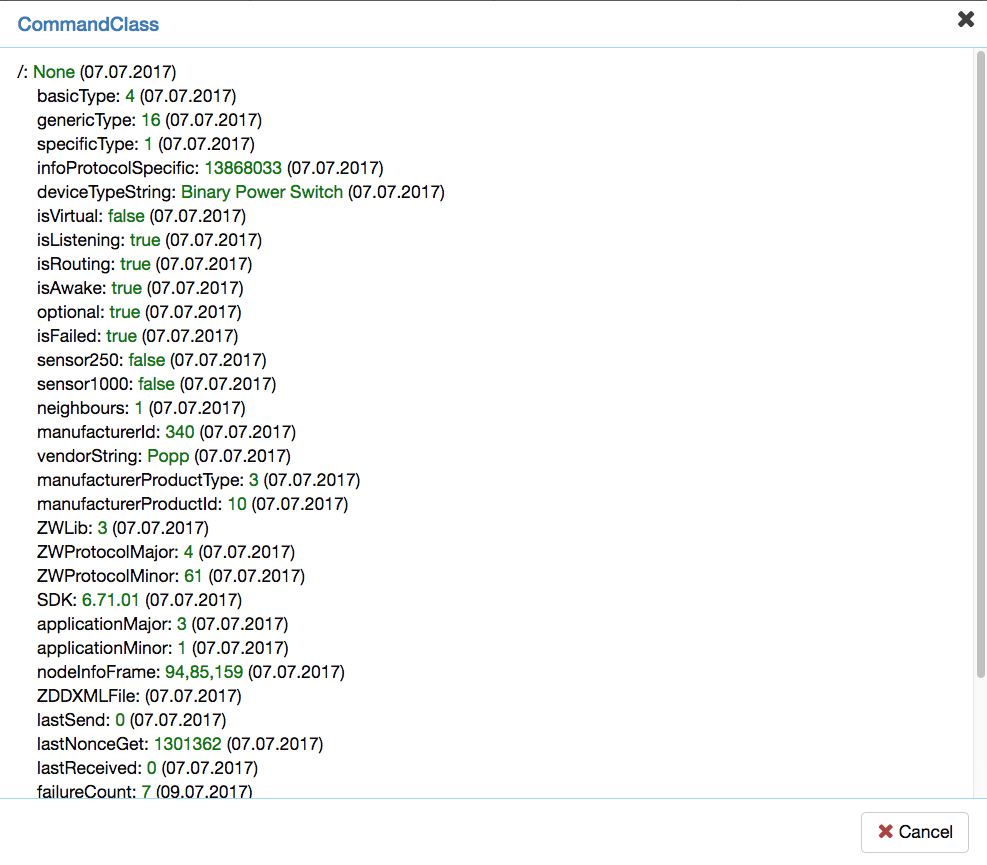
The data model or data holder object as described is Section 11.3.1 can be accessed completely using the Z-WAVE EXPERT USER INTERFACE . The two buttons Show controller Data and Show controllers device data in Network > Controller Info of Z-WAVE EXPERT USER INTERFACE as shown in Figure 11.4 lists all variables of the controller as such. One structure is controller-specific and one other structure is the data of the controller as node of the Z-Wave network. All nodes of the Z-Wave network have the very same data structure beside their individual array of instances and command classes per instance. This data model for the individual devices can be access using Configuration > Show Interview results in Z-WAVE EXPERT USER INTERFACE . Figure 11.6 shows this dialog. On the top of the window there is a button with the devices name. This button reveals the data structure of the individual device as shown in Figure 11.7.
The dialog has the list of all command classes and clicking on the name of the command class will open a sub dialog showing the data of the commend class. Each command class has some permanent values:
Any data holder object has properties value, updateTime, invalidateTime, name, but for compatibility with JS and previous versions we have valueOf() method (allows omitting .value in JS code, hence write "data.level == 255"), updated (alias to updateTime), invalidated (alias to invalidateTime).
Returns an associative array of changes in Z-Way data tree since <timestamp>. The array consists of (<path>: <JSON object>) object pairs. The client is supposed to assign the new <JSON object> to the subtree with the <path> discarding previous content of that subtree. Zero (0) can be used instead of <timestamp> to obtain the full Z-Way data tree.
The tree have same structure as the backend tree (Figure 11.2) with one additional root element "updateTime" which contains the time of latest update. This "updateTime" value should be used in the next request for changes. All timestamps (including updateTime) corresponds to server local time.
The object looks like:
[JSON Data Structure]
\{
  "[path from the root]": [updated subtree],
  "[path from the root]": [updated subtree],
  ...
  updateTime: [current timestamp]
}
Examples for Commands to update the data tree look like:
Get all data: /ZWaveAPI/Data/0
Get updates since 134500000 (Unix timestamp): /ZWaveAPI/Data/134500000
Please note that during data updates some values are updated by big subtrees. For example, in Meter Command Class value of a scale is always updated as a scale subtree by [scale].val object (containing scale and type descriptions).
This function is used to visualize the Z-Way job queue. This is for debugging only but very useful to understand the current state of Z-Way engine.
The information given on this page is only relevant for advanced Z-Wave developers and for debugging.
The table shows the active jobs with their respective status and additional information.
|
Table 11.2 summarizes the different values displayed on the Job Queue visualization. While this info is certainly not relevant for end users of the system it is a great debug tool.
A good design of a user interface is linking UI objects (label, textbox, slider, ...) to a certain path in the tree object. Any update of a subtree linked to user interface will then update the user interface too. This is called bindings.
For web applications Z-Way contains a library called jQuery.triggerPath (extention of jQuery written by Z-Wave.Me), that allows making such links between objects in the tree and HTML DOM objects. Use
var tree;
jQuery.triggerPath.init(tree);
during web application initialization to attach the library to a tree object. Then run
jQuery([objects selector]).bindPath([path with regexp], [updater function], [additional arguments]);
to make binding between path changes and updater function. The updater function would be called upon changes in the desired object with this pointing to the DOM object itself, first argument pointing to the updated object in the tree, second argument is the exact path of this object (fulfilling the regexp) and all other arguments copies additional arguments. RegExp allows only few control characters: * is a wildcard, (1|2|3) - is 1 or 2 or 3.
Please note that the use of the triggerpath extension is one option to handle the incoming data. You can also extract all the interesting values right when the data is received and bind update functions to them.
Security S2 inclusion process require additional interaction with the user during inclusion process. In addition to putting the device in Learn Mode and Z-Way in Add mode the user will be asked to grant different Security S2 keys and enter the PIN code.
To implement Security S2 inclusion process in your own app follow the steps below:
Z-Way keeps all files in one folder with exception of the log files. In Unix based platforms such as Linux PC, Raspberry Pi or open WRT the standard install folder is usually /opt/zway-server. The logfile is typically placed in /var/log/z-way-server.log but this location of the log file can be reconfigured in the config file.
On Windows, the installation wizard asked where to place Z-Way and where to place the log file.
Right after installation, the standard folder has the following content:
![\begin{forest}
for tree={
font=\ttfamily ,
grow'=0,
child anchor=west,
pare...
...onfig file]
[z-get-tty: Utility]
[z-way-server: Main Application]
]
\end{forest}](img4.svg)
The main config file in the root folder has XML file format. If only allows setting the log level (0 = log all, 9 = log almost nothing), the path to the log file and a debug port if needed. Don't change the setting for automation folder unless you really know what you do and why.
This is an example for the standard config.xml displaying all log right into the console.
[config.xml]
<config>
    <automation-dir>automation</automation-dir>
    <log-file></log-file>
    <log-level>0</log-level>
    <debug-port>0</debug-port>
</config>
This subfolder has the following structure:
![\begin{forest}
for tree={
font=\ttfamily ,
grow'=0,
child anchor=west,
pare...
...re]
]
[Defaults.xml: Default Settings]
[Profiles.xml]
[Rules.xml]
]
\end{forest}](img5.svg)
The file Defaults.xml allows defining various behavior of Z-Way, among them the appearance of Z-Way as secondary controller:
The file Profiles.xml contains the EnOcean profile definition. This clearly reflects the official profile definitions published by the EnOcean alliance.
The file Rules.xml is a legacy file.
![\begin{forest}
for tree={
font=\ttfamily ,
grow'=0,
child anchor=west,
pare...
...r Name]
[ZWavePlus.xml: Z-Wave Plus Role Types and Network Types]
]
\end{forest}](img6.svg)
All files in this subfolder are XML files and some of them require local language translations, as described in Chapter 10.3.
ZDDX files (Z-Wave Device Description XML Files) are XML files containing verbal description of a specific Z-Wave device that cannot be called from the device itself during the interview process: They are:
It is possible to add your own ZDDX files, but Z-Way uses an index file ZDDX.indx to access them. Once a new file is added, run python MakeIndex.py.
Chapter 13.5 explain how to add and to submit new own ZDDX files and how to extend them.
![\begin{forest}
for tree={
font=\ttfamily ,
grow'=0,
child anchor=west,
pare...
...marthome: Smart Home User Interface]
[translation]
[index.html]
]
\end{forest}](img7.svg)
This subfolder is the root folder of the embedded webserver. The index.html redirects to smarthome/index.html.
![\begin{forest}
for tree={
font=\ttfamily ,
grow'=0,
child anchor=west,
pare...
... hour history display]
[...: more json files containing data]
]
]
\end{forest}](img8.svg)
The subfolder for automation contains the whole JavaScript (JS) subsystem including the
The most sensitive file is configjson-XXX since it contains the information about the user accounts including login name, password, and recovery email.
For more information about the creation of new modules that will be placed into the user modules, please refer to Chapter 13.4.
The Z-Way library is a middleware between Silicon Labs Z-Wave transceiver and your application. Z-Way offers pretty high level API to control Z-Wave devices and manage wireless network.
Interaction with the library covers three aspects:
Every command request generates an outgoing packet (job). Before generating a packet, library will validate parameters and check whether the command is supported by the recipient. In case of failure command will return error immediately.
Once a job is generated, it is placed into outgoing queue for future send. The queued jobs are handled internally by Z-Way engine according to commands priorities, nodes states and capabilities, transceiver state etc.
Once the job is sent, it must be first confirmed it was successfully delivered to the Z-Wave stack, and then confirmed it was delivered to the recipient. All these operations are performed asynchronously, so command may provide a callback function to call in case of success or failure if it is needed to know delivery result.
After the delivery was confirmed, command is considered executed. If it was a state request command (i.e. SensorMultilevel Get), response packet may be delayed (or even not sent at all), so command's success/failure callbacks cannot be used to get requested state immediately.
All incoming packets from the Z-Wave network are automatically parsed by Z-Way and stored in special variables called data holders. Data holder is a named variable that stores a value along with its data type and time the value was last updated and "invalidated". Each data holder may also contain a set of child data holders, so they form a hierarchical data storage. Data holders also support callbacks, so custom code may be executed each time the value is updated.
For example, level data holder stores dimming level of a dimmer. Once application executes a Get command for that dimmer, Z-Way will update invalidateTime property on the level data holder, so application knows the current value is assumed to be outdated, but the new one was not received yet.
Once Z-Way received a packet with new value of the dimmer, it will store it in level data holder and update updateTime property. Since updateTime is greater that invalidateTime, the value is considered valid now.
Z-Wave device can also send unsolicited state reports to controller (without a request from controller's side; e.g. due to local operation or periodically). Due to asynchronous nature of Z-Wave protocol, controller can't tell whether the packet was sent unsolicited or it is a response to the previous command. So unsolicited packet will be handled the same way exactly.
Z-Way inherits structure of Z-Wave protocol and divides data holders and commanda on different Command Classes (CC). Command Classes are building blocks of Z-Wave functionality. For example, dimming is provided by Command Class SwitchMultilevel, relay operation by Command Class SwitchBinary, sensors by command class SensorMultilevel and SensorBinary etc. Please consult Z-Wave protocol basics to understand Z-Wave Command Classes.
All Command Classes share a minimal subset of common data holders:
All the other data holders are specific to each Command Class. For example, SwitchMultilevel Command Class contains level data holder, SensorBinary has two-level storage, grouping data by sensor types: 0 -> sensorTypeString, level, 5 -> sensorTypeString, level, ... where type identifiers are Z-Wave specific constants. Every Z-Wave specific constant value will have corresponding verbal description (in case of SensorBinary it is in sensorTypeString data holder).
Some Command Classes are hidden under the hood of Z-Way: MultiCmd, Security, CRC16, MultiChannel, ApplicationStatus. They're handled internally by Z-Way software, and shouldn't be used directly.
Some Command Classes have no public APIs, but their data holders may be very useful in your application: AssociationGroupInformation, DeviceResetLocally, ManufacturerSpecific, Version, ZWavePlusInfo.
All the remaing Command Classes have their Get and Set commands specific to functionality of the Command Class. Consult CommandClassesPublic.h header file for more info about available commands for different Command Classes and their meaning.
Z-Way offers API for network management operations: include new devices, exclude devices, discover neighbor devices, remove failed nodes, frequency selection, controller reset etc. These functions are described in ZWayLib.h header file.
Z-Way also provides a low level access to Z-Wave transceiver functionality through Silicon Labs Serial API. These functions are provided by Function Classes. You should use them only if you have deep knowledge of Z-Wave networking. Check FunctionClassesPublic.h for more info.
To use Z-Way one need to include few header files:
\string#include <ZWayLib.h>
\string#include <ZLogging.h>
Z-Way will need to know where to write the log to, so first of all you need to create logging context using zlog_create() call. You can disable logging by passing NULL instead of logging context to Z-Way.
Then create new a Z-Way context using zway_init(). It will only allocate memory, open log files, initialize internal structures. At this point you can already attach your handlers on new device/instance/Command Class creation (you will also be able to do it at any time later). Do it using zway_device_add_callback() call.
Warning: you should initialize ZWay pointer with NULL before passing it to zway_init!
Executing zway_start() will open serial port and start a new thread that will handle all communications with the transceiver. From now Z-Way can receive packets from the network, but can not parse them yet, since devices were not discovered yet. All received packets will just be queued to be parsed later after discovery process.
Last step to run Z-Way is zway_discover() call. It will start communications with the Z-Wave transceiver and ask about devices in the network, their capabilities, network state etc. During discovery phase Z-Way will create structures for all devices and load saved data from file stored in config/zddx folder.
From now on, Z-Way is ready to operate. Incoming events will trigger callback functions attached by application, and executing commands will put new packets in the queue.
You will also need few other functions zway_is_running(), zway_is_idle(), zway_stop(), zway_terminate() to handler termination process.
Security S0 inclusion is completely handled by the Z-Way library.
Security S2 inclusion with Z-Way library requires user interaction. Z-Way offers various options:
Add the device DSK using zway_node_provisioning_dsk_add() with a pointer to 16 bytes DSK and filled the NodeProvisioningData structure (instead of filling it one can fill it with zeros).
The inclusion and key exchange will happen automatically on the device's power-up.
All keys will be granted to the device.
zway_dsk_string_to_bytes() can be used to convert AAAAA-BBBBB-...-HHHHH into 16 bytes.
After inclusion start subscribe to Command Classes creation (using zway_device_add_callback() with CommandAdded flag) and wait for SecurityS2 creation. Then subscribe to the change of requestedKeys and puclickKey data holders on SecurityS2 Command Class data (using zdata_add_callback()).
On requestedKeys change inspect inner data holders for the list of requested keys and fill all grantedKeys inner data holders (by setting TRUE or FALSE).
Once done, set grantedKeys data holder to TRUE.
Alternatively, set grantedKeys to an integer value as Granted Key mask (0x80 (S0) | 0x01 (S2 Unauthenticated) | 0x02 (S2 Authenticated) | 0x04 (S2 Access Control)).
On puclickKey update check it against the DSK on the device (it is good to show the full key to the customer to allow full check).
Copy the key in the puclickKeyVerified data holder to confirm. If publicKeyVerificationRequires is set to TRUE, the user should also be asked for the PIN code. This two-bytes code should replace the two leading zero bytes of the puclickKey.
Just before starting the inclusion process with zway_controller_add_node_to_network set data holders on the controller S2AutoInclude.pin=XXXXX (PIN number) and S2AutoInclude.keys=Y (-1 for all keys, 0x80 for S0 only, 0x01 for S2 Unauthenticated, 0x02 for S2 Authenticated, 0x04 for S2 Access, or any ORed combination to provide multiple keys)
If there is no need for S2 Authentication or S2 Access keys, just specify pin=0 and keys=0x01. This will give S2Unauthenticated without entering the PIN code. keys=0x81 will grant S0 and S2 Unauthenticated.
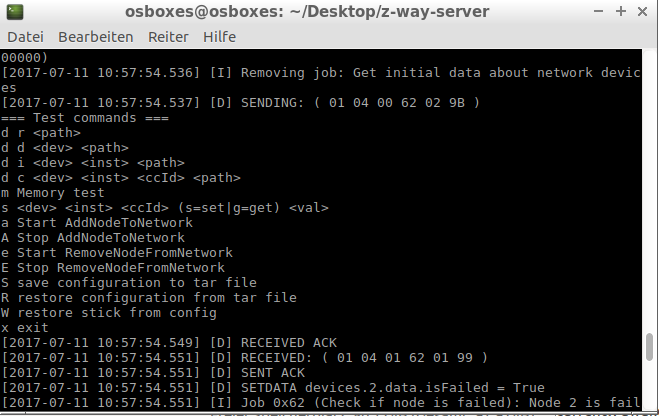
The link
https://storage.z-wave.me/z-way-server/z-way-test.tgz
downloads a very simple test project using the Z-Way core library libzway.so. The project contains a simple mains.c plus a Makefile. A Z-Way installation is required too. To compile the test project, some requirements need to be met:
Executing the Makefile will generate a binary executable z-way-test in the same folder. If Z-Way was just downloaded the code will assume a virtual serial Z-Wave device on /dev/ttyUSB0. if your virtual device is a different node, just make a symlink like ln -s /dev/ttyACM0 /dev/ttyUSB0 or change main.c file.
Now start the code from the folder with LD_LIBRARY_PATH=./libs ./z-way-test. The header file Z-Waylib.h in libzway gives a brief explanation of the calls into the library. The demo file main.c demonstrates the use of the calls. Figure 11.8 shows the small help page of the test software.