Z-Way is very flexible and supports integrations with various popular home automation systems. This allows you to use the power of the Z-Way's built-in Z-Wave engine with network analytics tools and use the UI or voice assistant you like.
Popular integrations:
- MQTT
- Home Assistant
- openHAB
- HTTP API
- iRidi Pro (iRidium mobile)
- Node-RED
- WebSocket API
- Apple HomeKit and Siri
- Google Home
MQTT
MQTT is a popular messaging protocol for the Internet of Things. It's easy and powerful. Almost every system has a MQTT connector. Z-Way has a MQTTClient app.
Here we desribe the process of an external system connection to a Z-Way instance.
1. Let's say in an external system you has a configuration where you entered the ID, MQTT user name and MQTT password.
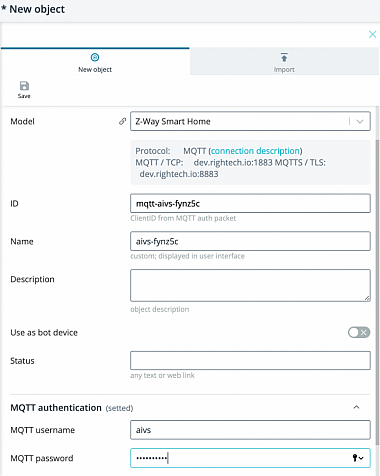
2. Open a local apps tab of Z-Way interface and launch MQTTClient.
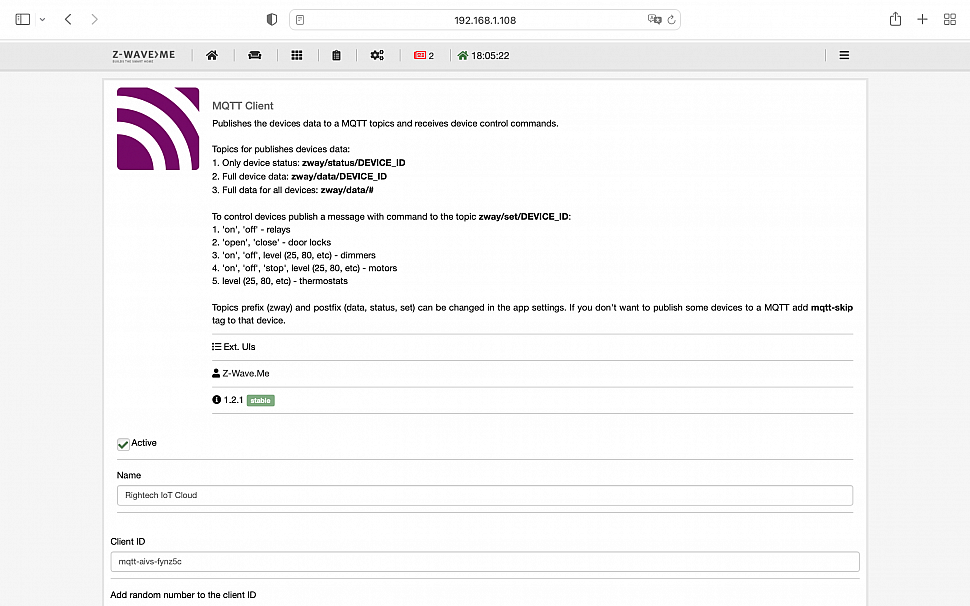
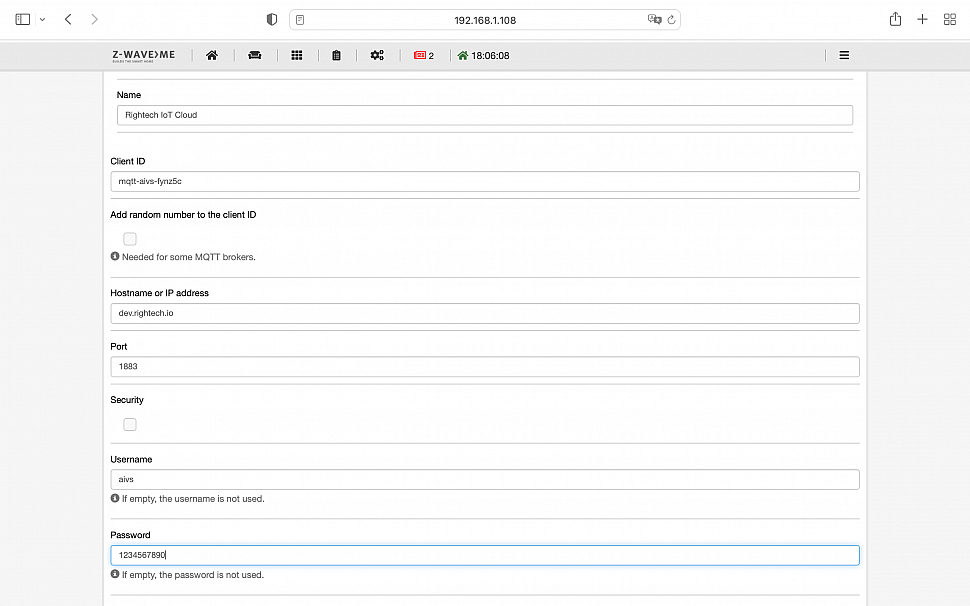
3. Fill in the corresponding ID, MQTT server address, login and passsword and save the configuration.
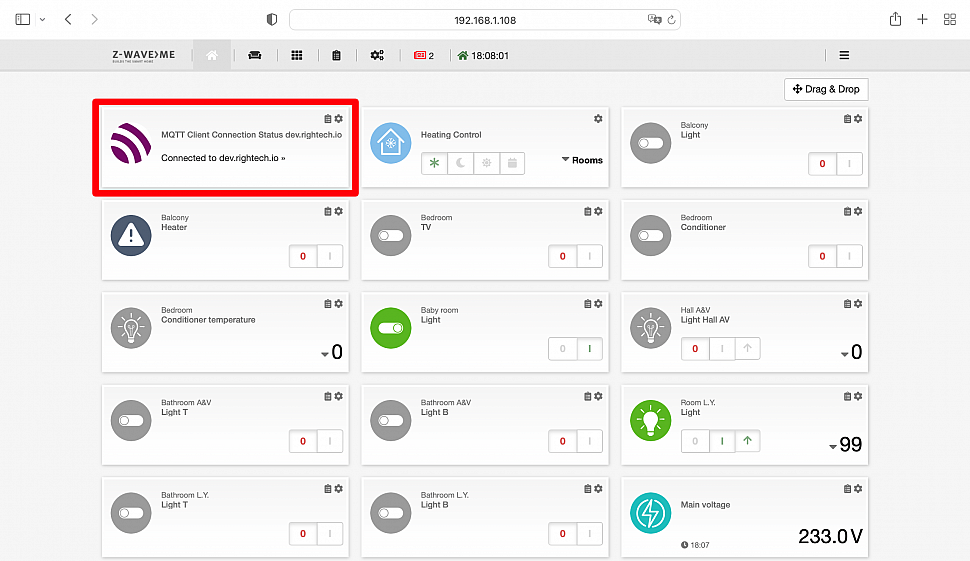
4. Open a device list in the Z-Way interface. There you will find a status of MQTT connection.
Home Assistant
Home Assistant is truely a leader among open Smart Home hub software. With Home Assistant one can manage smart devices based on technologies like Z-Wave, ZigBee, WiFi and any others.
The integration with Home Assistant is available at the official Home Assistant website.
This integration allows you to control a Z-Wave network via the Z-Wave.Me Z-Way. It combines the performance and the power of the diagnostics tools built-in Z-Way with the flexibility of Home Assistant. The integration brings all Z-Way devices in Home Assistant (Z-Wave, Zigbee, EnOcean, HTTP based, and others).

It is also possible to run Z-Way in a supervised Home Assistant environment, HAOS and Home Assistant Yellow. Install the Z-Wave.Me add-on.

openHAB
openHAB is a vendor and technology agnostic open source automation software for your home.
The built-in Z-Wave.Me Z-Way add-on automatically detects all devices on the controller and add them to openHAB things. To access the controller, you need to know IP address and login/password.
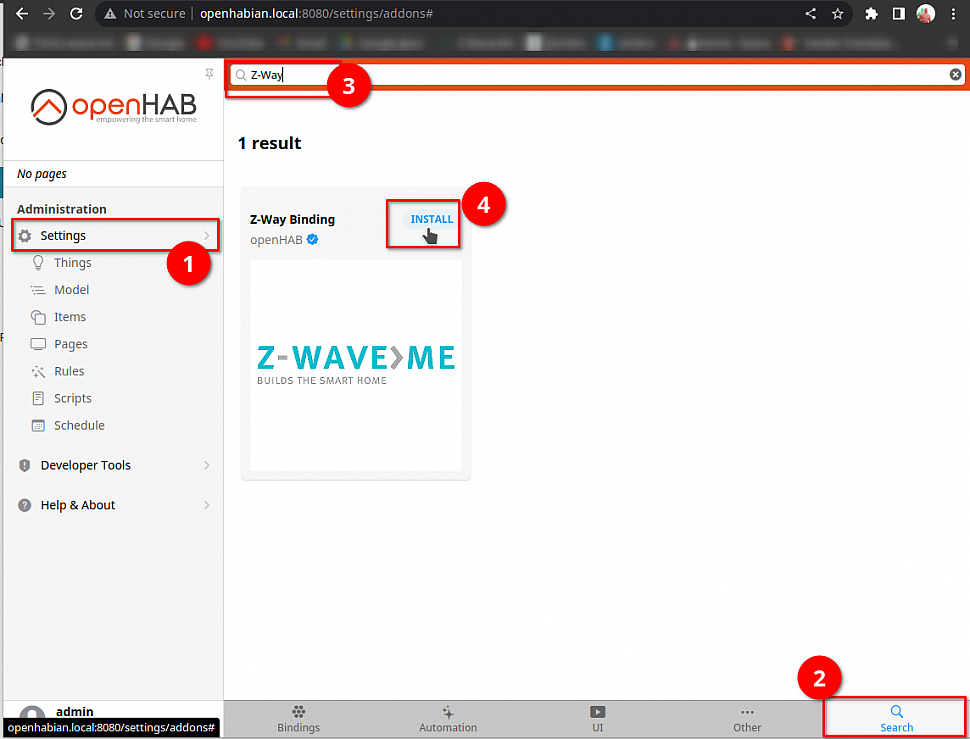
Follow the detailed guide.
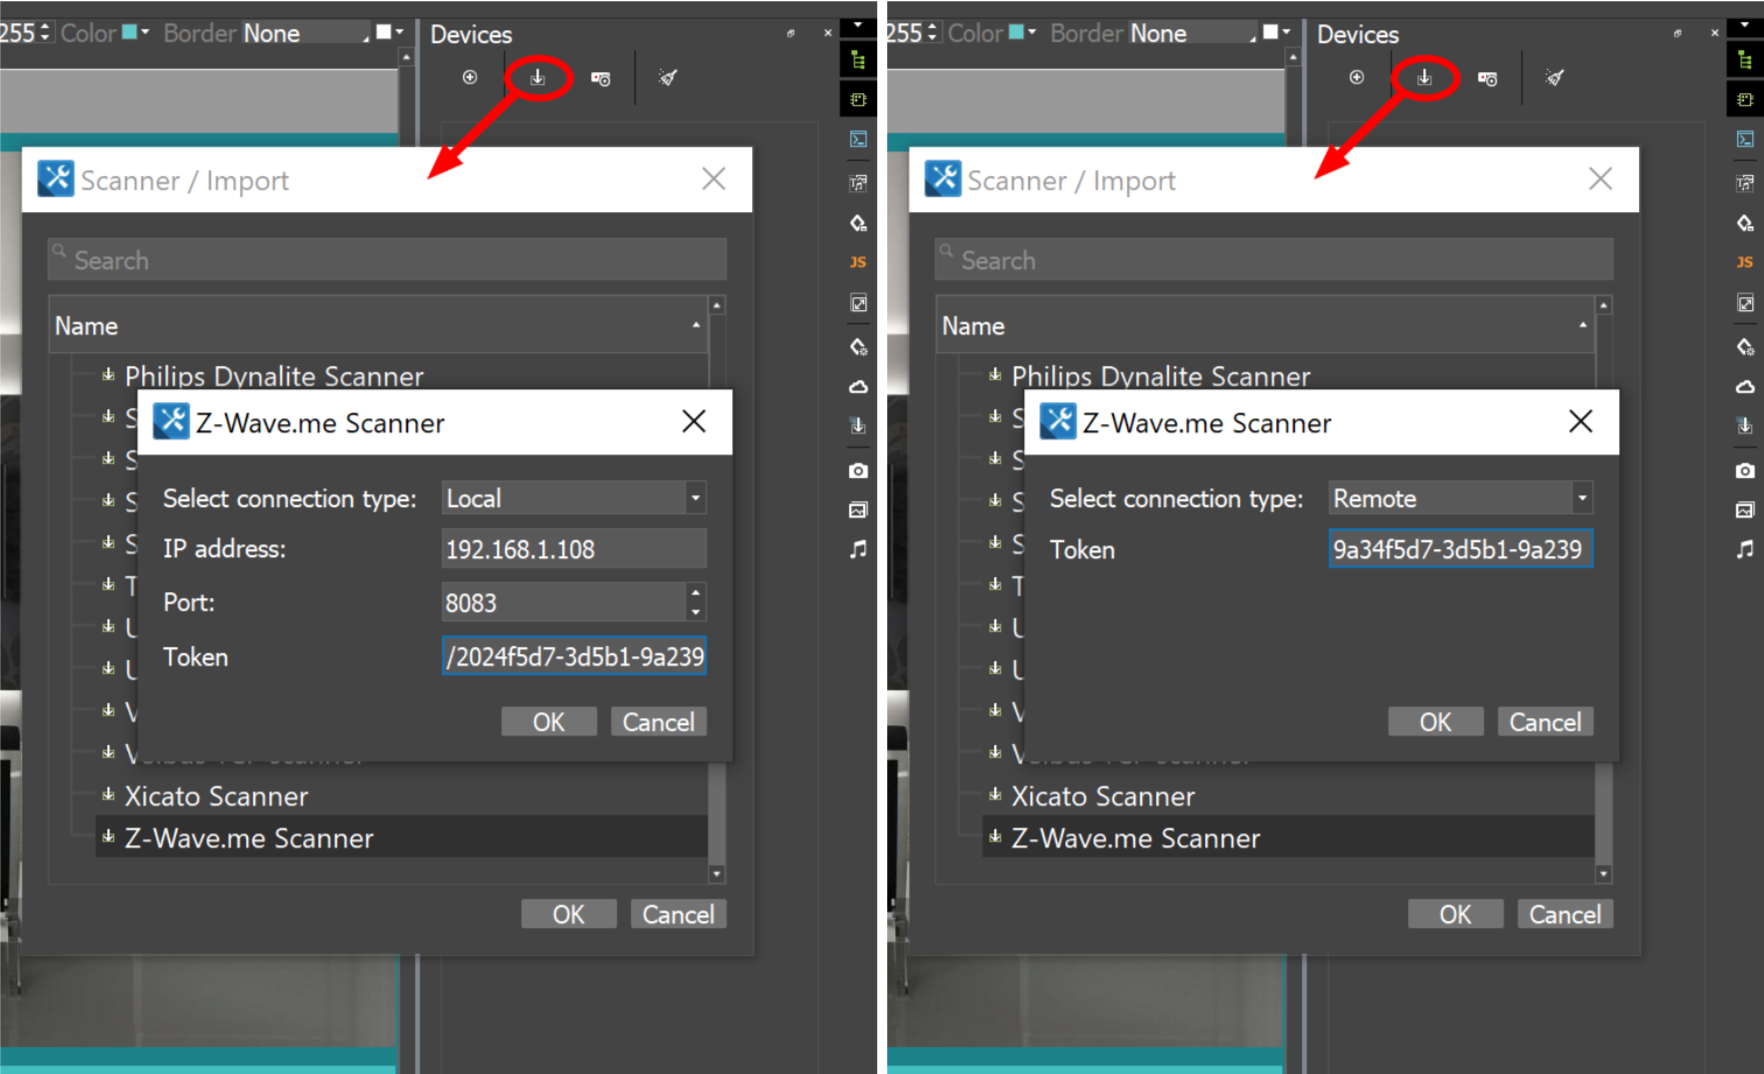
iRidi Pro (iRidium mobile)
iRidi Pro is an advanced visualization system for large automation projects. It is the best way to create a customized user interface adopted to your customer's needs.
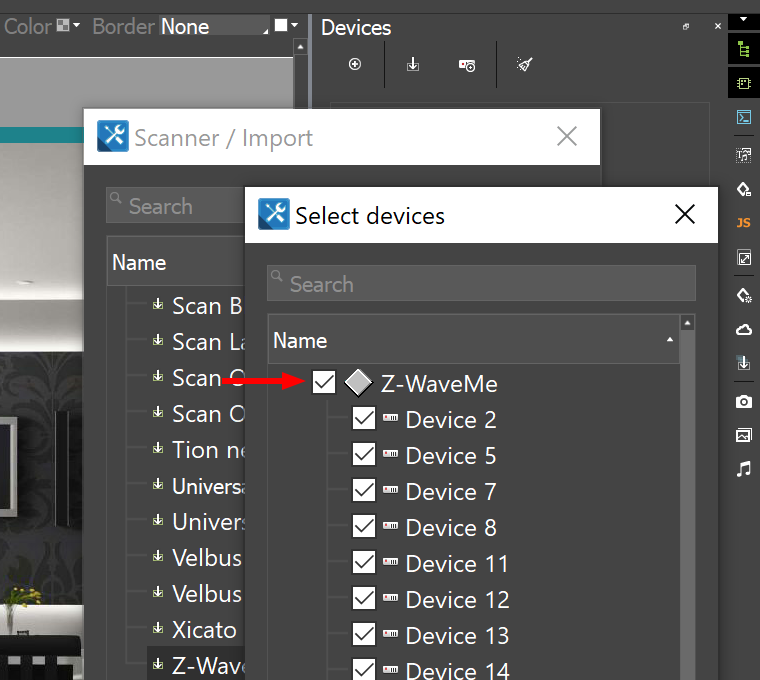
The built-in Z-Wave.Me Z-Way driver automatically detects all devices on the controller and add them to the project. To access the controller, you need to know IP address and generate an access token.
A list with all devices on the controller will appear, to add all devices to the project, check the box next to Z-Wave.Me.
Follow the detailed guide.
Node-RED
Node-RED is a programming tool for wiring together hardware devices, APIs and online services in new and interesting ways. It provides a browser-based editor that makes it easy to wire together flows using the wide range of nodes in the palette that can be deployed to its runtime in a single-click.
The integration is based on node-red-contrib-zway contribution project by @bkorda
Configuration: set up the URL of the Z-Way server and enter the Z-Way API token.
HTTP API
For the following examples the ip and the port 192.168.0.3:8083 is the Z-Way address.
Command examples:
- HTTP LowLevelAPI - http://192.168.0.3:8083/JS/Run/zway.devices[2].instances[0].commandClasses[37].Set(255)
- HTTP HAAPI (GET) - http://192.168.0.3:8083/ZAutomation/api/v1/devices/ZWayVDev_2:0:37/command/on
- JS API - http://192.168.0.3:8083/JS/Run/controller.devices.get("ZWayVDev_2:0:37").performCommand("on")
- HTTP LowLevelAPI - http://192.168.0.3:8083/JS/Run/zway.devices[2].instances[0].commandClasses[37].Set(0)
- HTTP HAAPI (GET) - http://192.168.0.3:8083/ZAutomation/api/v1/devices/ZWayVDev_2:0:37/command/off
- JS API - http://192.168.0.3:8083/JS/Run/controller.devices.get("ZWayVDev_2:0:37").performCommand("off")
- HTTP LowLevelAPI - http://192.168.0.3:8083/JS/Run/zway.devices[3].instances[0].commandClasses[38].Set(46)
- HTTP HAAPI (GET) - http://192.168.0.3:8083/ZAutomation/api/v1/devices/ZWayVDev_2:0:37/command/off
- JS API - http://192.168.0.3:8083/JS/Run/controller.devices.get("ZWayVDev_3:0:38").performCommand("exact",46)
- HTTP LowLevelAPI - http://192.168.0.3:8083/JS/Run/zway.devices[2].instances[0].commandClasses[37].data.level.value
- HHTTP HAAPI (GET) - http://192.168.0.3:8083/ZAutomation/OpenRemote/metrics/ZWayVDev_2:0:37
- JS API - http://192.168.0.3:8083/JS/Run/controller.devices.get("ZWayVDev_2:0:37").get("metrics:level")
- HTTP LowLevelAPI - http://192.168.0.3:8083/JS/Run/zway.devices[4].instances[0].commandClasses[48].data[1].level.value
- HTTP HAAPI (GET) - http://192.168.0.3:8083/ZAutomation/OpenRemote/metrics/ZWayVDev_4:0:48:1
- JS API - http://192.168.0.3:8083/JS/Run/controller.devices.get("ZWayVDev_4:0:48:1").get("metrics:level")
- HTTP LowLevelAPI - http://192.168.0.3:8083/JS/Run/zway.devices[4].instances[0].commandClasses[49].data[1].level.value
- HTTP HAAPI (GET) - http://192.168.0.3:8083/ZAutomation/OpenRemote/metrics/ZWayVDev_4:0:49:1
- JS API - http://192.168.0.3:8083/JS/Run/controller.devices.get("ZWayVDev_4:0:49:1").get("metrics:level")
WebSocket API, Apple HomeKit and Siri, Google Home
These integrations are easy as a pie. Just follow the manual.
WebSocket API
Apple HomeKit and Siri
Google Home